
2.7 Step 6: Add Users and Workspaces
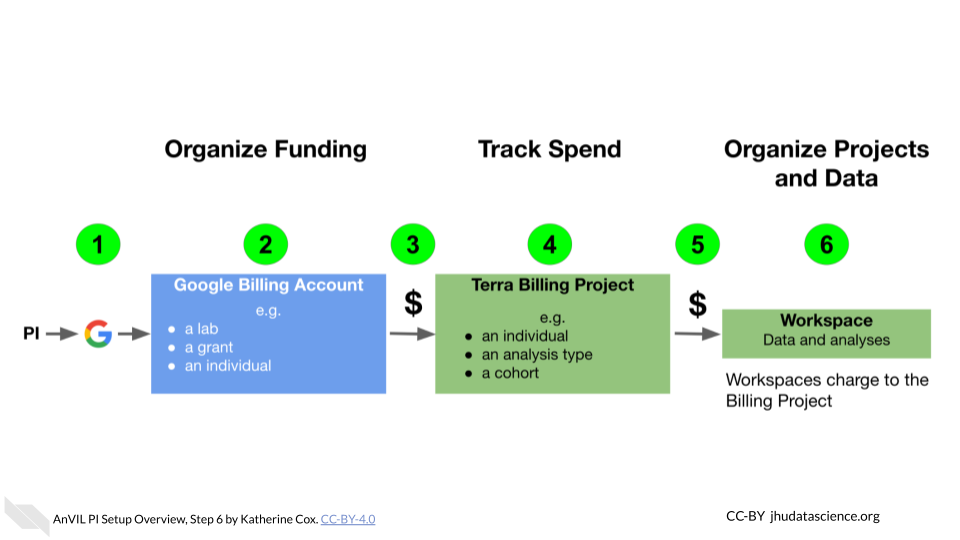
Finally, back on Terra, you can add lab members and give them permission to run analyses funded through your Billing Projects.
There are two primary ways to permit users to charge to your Billing Projects:
- Add them directly to the Billing Project. This gives them flexibility to create and manage their own Workspaces, but reduces your control over spending. Anyone they add to their Workspaces with sufficient permissions (i.e. permission to compute) can charge to your Billing Project.
- Create a Workspace yourself, and add them to the Workspace (or have a designated Lab Manager responsible for managing Workspaces). This gives you much more control over who can charge to your Billing Project.
Billing permissions on Terra can be confusing. For this reason, We recommend starting by having a single person responsible for managing all Workspaces (either yourself or a trusted “lab manager”). This person should create all Workspaces and add lab members as Writers (not Owners) to the Workspaces. This provides the greatest control over spending. Once you are familiar with the permissions system and are certain your lab members understand the implication of different permission settings, you may decide to give them greater control over Workspace access.
2.7.1 Create a New Workspace
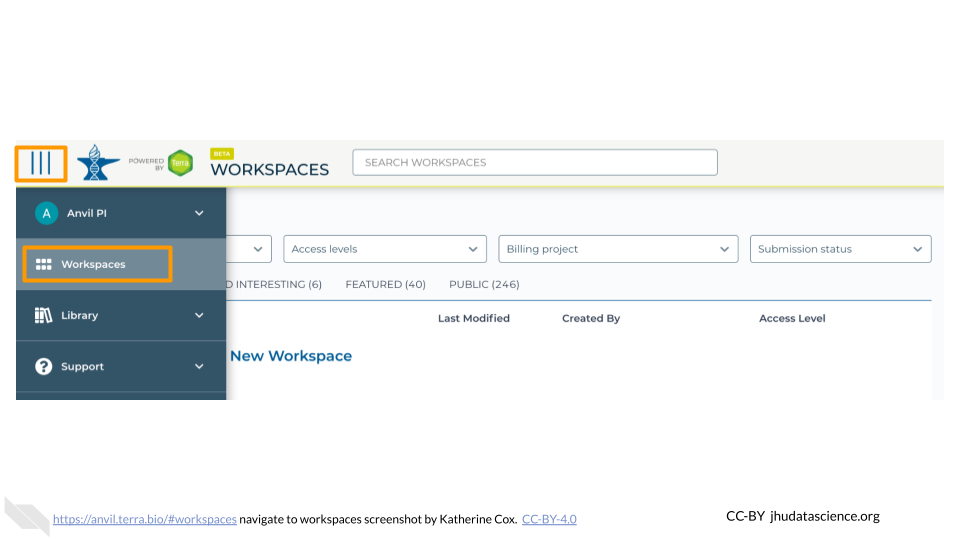
In the drop-down menu on the left, navigate to “Workspaces”. Click the triple bar in the top left corner to access the menu. Click “Workspaces”.
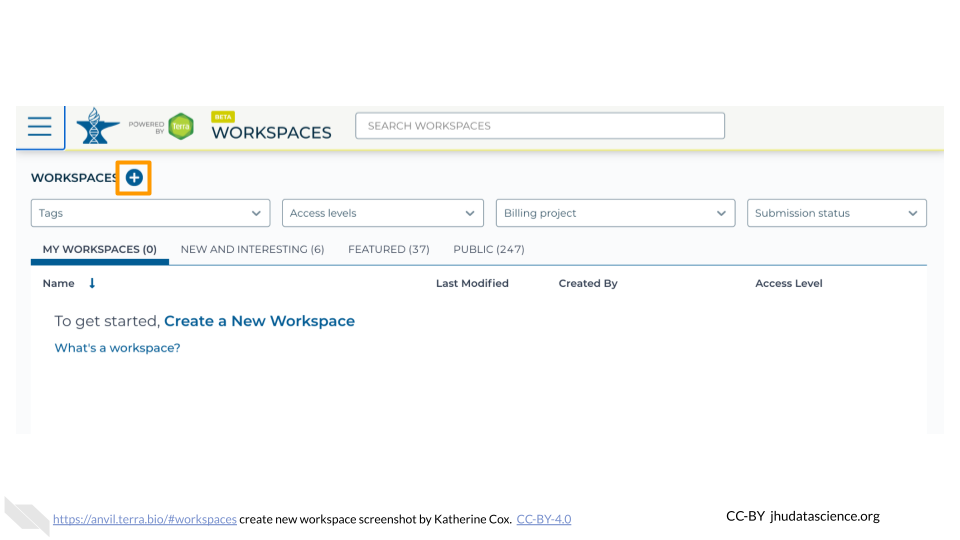
Click on the plus icon near the top of left of the page.
Name your Workspace and select the appropriate Billing Project. All activity in the Workspace will be charged to this Billing Project (regardless of who conducted it).
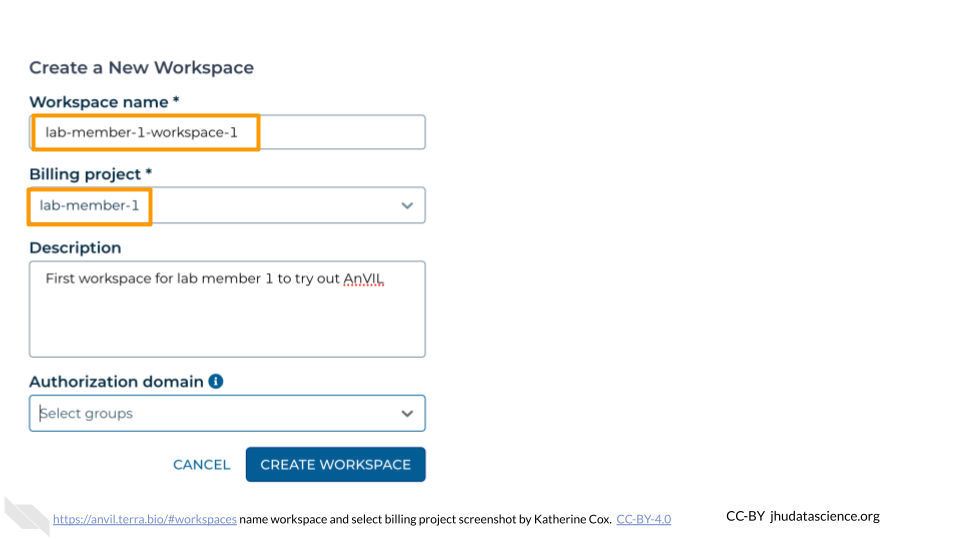
If you are working with protected data, you can set the Authorization Domain to limit who can be added to your Workspace. Note that the Authorization Domain cannot be changed after the Workspace is created (i.e. there is no way to make this Workspace shareable with a larger audience in the future). Workspaces by default are only visible to people you specifically share them with. Authorization domains add an extra layer of enforcement over privacy, but by nature make sharing more complicated. We recommend using Authorization Domains in cases where it is extremely important and/or legally required that the data be kept private (e.g. protected patient data, industry data). For data you would merely prefer not be shared with the world, we recommend relying on standard Workspace sharing permissions rather than Authorization Domains, as Authorization Domains can make future collaborations, publications, or other sharing complicated.
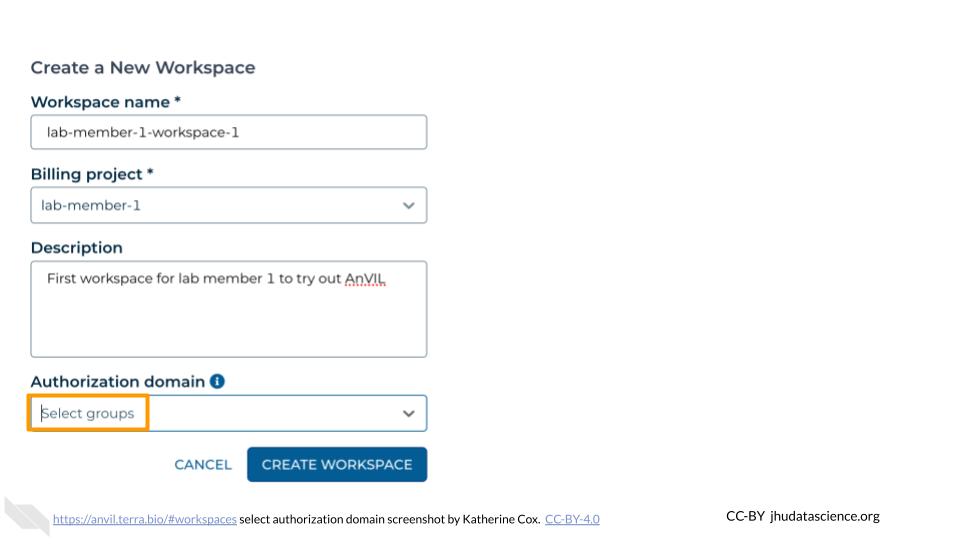
Click “CREATE WORKSPACE”. The new Workspace should now show up under your Workspaces.
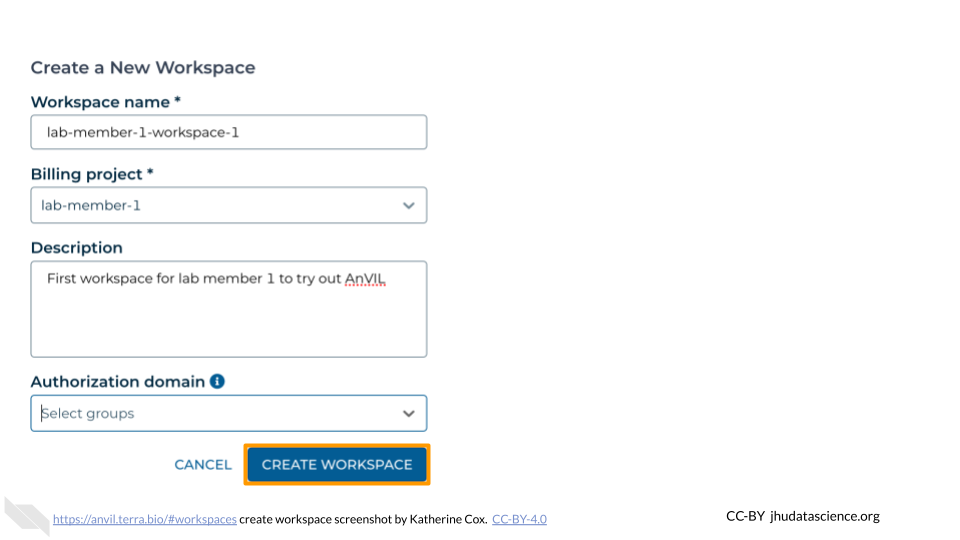
To start, we recommend creating one Workspace for each lab member (associated with that lab member’s Billing Project, with separate Billing Projects for your lab members). This will enable you and your lab members to familiarize yourself with Workspaces and decide how best to organize your work. You can then create additional Workspaces as needed.
2.7.2 Add Members to Workspaces
Lab members must have logged in to Terra at least once before they can be added to your Billing Projects and Workspaces (they do not need to log in to Google Cloud Console). You can send lab members to the Data Analysts guide for instructions on how they can sign up and start working on AnVIL.
Lab members can be added to a Workspace with a few different permission levels:
- Readers can view the Workspace but not make edits or run analyses (i.e. they cannot spend your money)
- Writers can make edits and run analyses (i.e. they can spend your money)
- Owners can make edits and run analyses and can also manage the permissions of other users (i.e. they can enable others to spend your money)
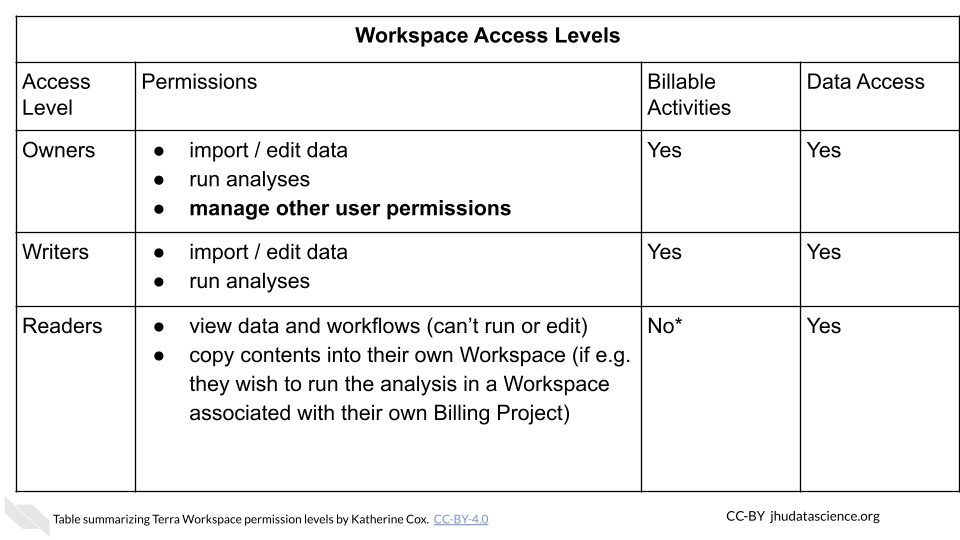
More details about the permissions associated with each Access Level can be found in the Terra documentation.
Managing permissions for a Workspace has important implications:
- Billing: Terra charges are associated with Workspaces rather than users. Any billable activity that takes place in a given Workspace will be charged to the associated Billing Project, regardless of who conducted the activity. If there are multiple users with permission to compute, it is impossible to tell who conducted the activity.
- Data access: Especially when working with protected data, it’s important to ensure that users have proper authorization to view the data before giving them access to a Workspace containing the data. Terra provides Authorization Domains to assist with this.
In general we recommend:
- Writers: Lab members who need permission to compute (and charge to your Billing Project). This gives them permission to freely use the Workspace, (adding and removing data, conducting analyses, etc.) but prevents them from adding additional members who could charge to your Billing Project. This ensures you have control over who is doing the spending.
- Readers: All other users (i.e. users who need to see the Workspace but should not charge to your Billing Project). Readers can always “clone” the Workspace (creating a copy of it associated with their own Billing Project) if they want to run computations themselves.
- If working with protected data, take advantage of Authorization Domains to increase security.
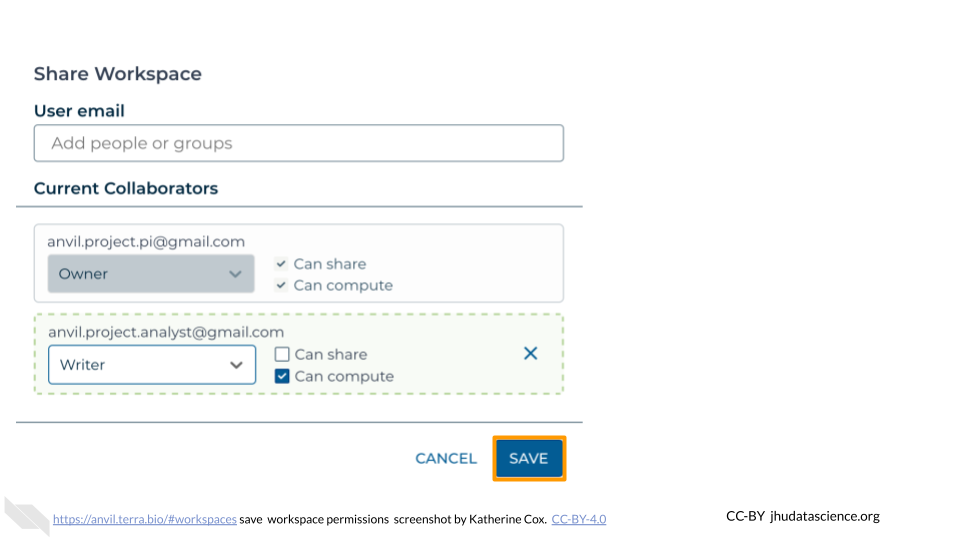
To add a member to a Workspace:
In the drop-down menu on the left, navigate to “Workspaces”. Click the triple bar in the top left corner to access the menu. Click “Workspaces”.
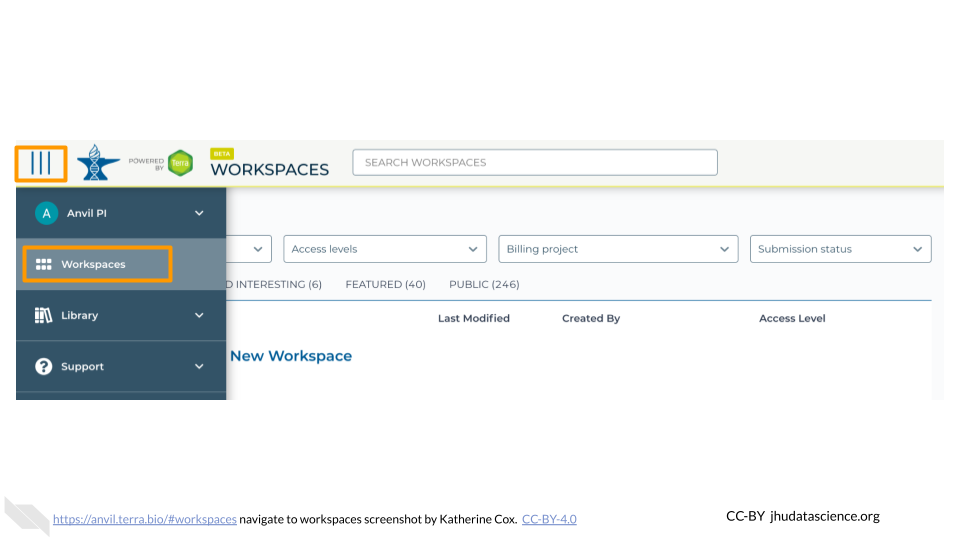
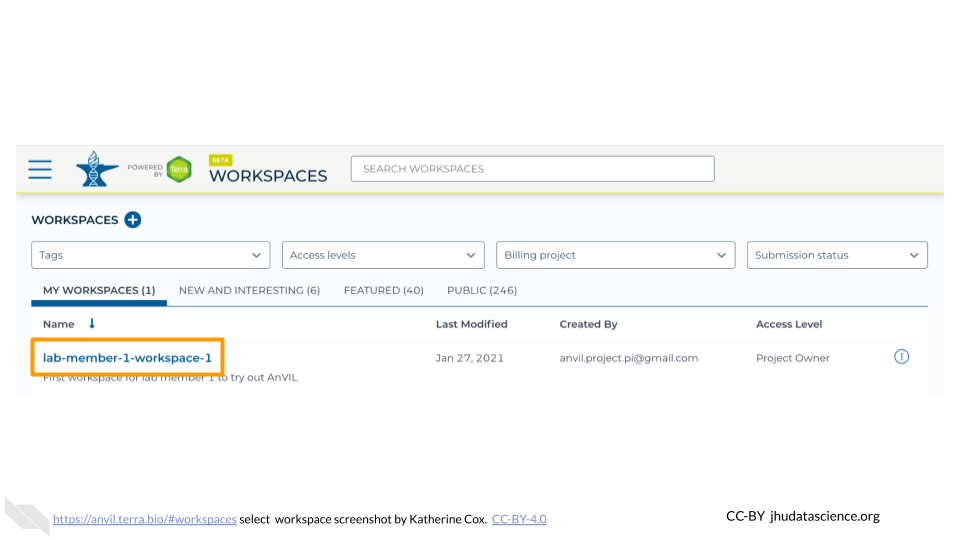
Click on the name of the Workspace to open the Workspace. Opening a Workspace does not cost anything. Certain activities in the Workspace (such as running an analysis) will charge to the Workspace’s Billing Project. Workspace management (e.g. adding and removing members, editing the description) does not cost money.
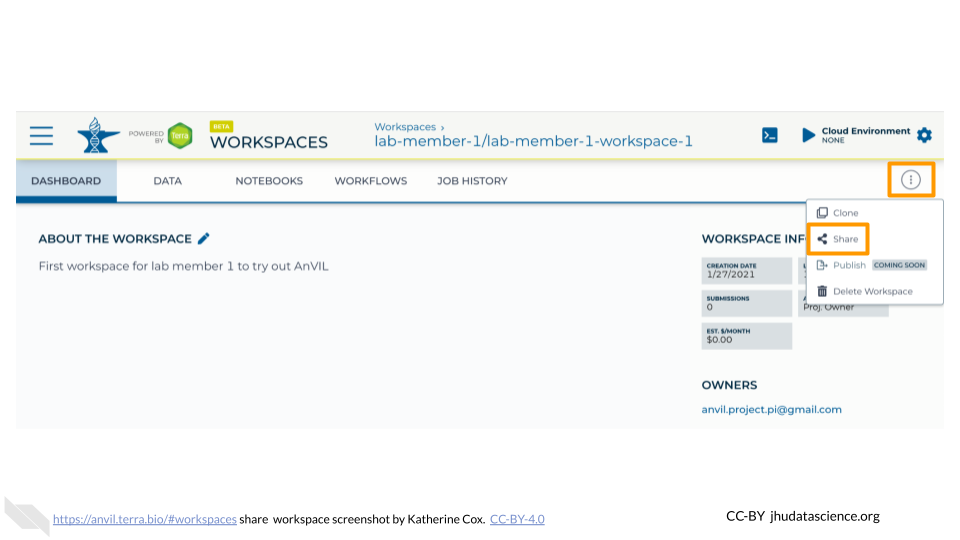
Click the teardrop button (
 ) on the right hand side to open the Workspace management menu. Click “Share”
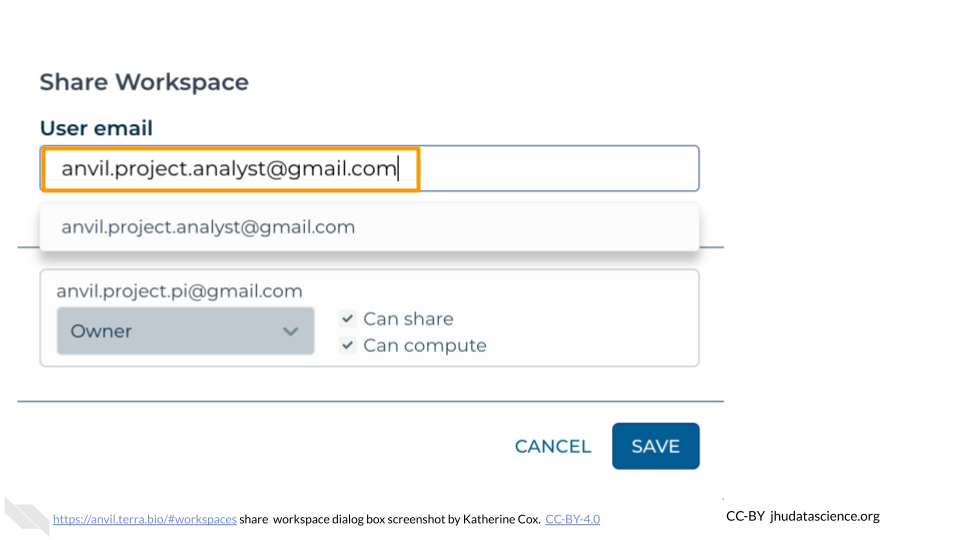
Enter the email address of the user or Group you’d like to share the Workspace with.
- If adding an individual, make sure to enter the account that they use to access AnVIL.
- If adding a Terra Group, use the Group email address, which can be found on the Terra Group management page.
Choose their permission level.
- Remember that all activity in the Workspace will be charged to the Workspace’s Billing Project, regardless of who conducts it, so only add members as “Writers” or “Owners” if they should be charging to the Workspace’s Billing Project.
- “Readers” can view all parts of the Workspace but cannot make edits or run analyses (i.e. they cannot spend money). They can also clone their own copy of the Workspace where they can conduct activity on their own Billing Project.
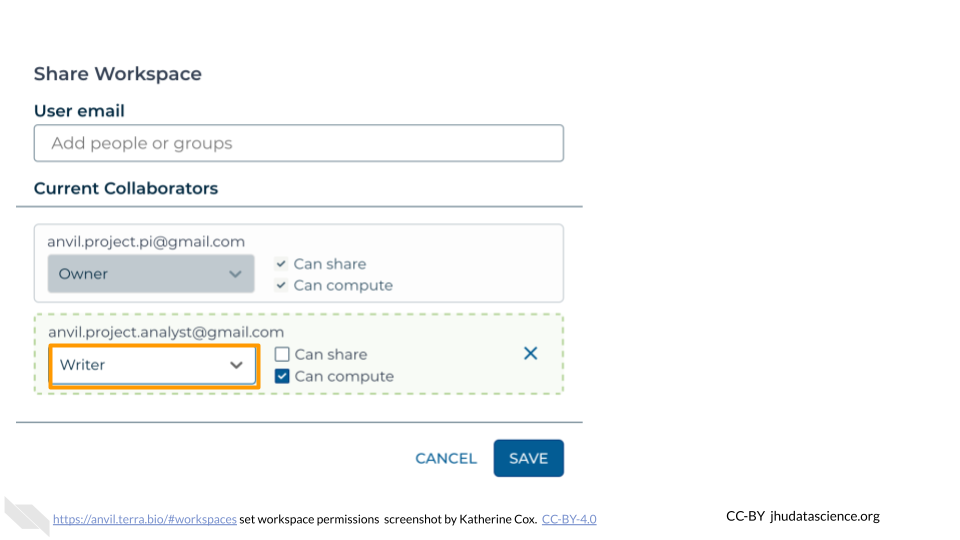
Click “Save”. The user should now be able to see the Workspace when logged in to Terra.
2.7.3 Request Quota Increase
To prevent abuse, new users of GCP are only permitted to create a few Google Cloud “Projects”. When working on Terra, each Terra Workspace is associated with its own Google Cloud Project, so if your team has multiple members you can bump up against this limit fairly quickly and won’t be able to create more Workspaces.
Since this limit is imposed by Google, you will need to contact them directly to request a quota increase, using this form.
At the time of writing (April 2022) Terra is working to expedite this process for Terra users; we recommend checking the relevant Terra documentation for the latest information as well as recommendations about how to fill out the form.