2.1 Account Setup Overview
2.1.1 Goals for This Guide

2.1.2 Design Philosophy
This guide provides an opinionated walkthrough on how to set up AnVIL for your lab, based on experiences from many labs actively using AnVIL. These step-by-step instructions take team leads that are completely new to the AnVIL through account setup to the point where team members can start working on AnVIL. Following the recommendations in this guide will help you more clearly see where charges are coming from and have greater control over which users can spend your money and access your data. In support of these goals we have made the following design decisions:
- COST CONTROL
- Prevent charges to your funding account until you explicitly give authorization by starting with Google’s free $300 credit program
- Control who can charge to your account by limiting who can “share” permission to compute - yourself and any designated “Lab Managers”
- COST TRANSPARENCY
- Allow fine-grain accounting of who spent what by creating individual “Billing Projects” for each user
- Monitor costs by setting up email alerts to warn you when you reach spending thresholds
- Enable detailed analysis of costs by exporting cost data using BigQuery
- DATA ACCESS CONTROLS
- Reduce unwanted access by limiting who can “share” your data and analyses - yourself and any designated “Lab Managers”
- Stricter data access management can be enforced through “Authorization Domains”; however this can make future sharing and publication difficult. This guide recommends avoiding Authorization Domains for most uses, especially as you are starting out. If you are working with highly sensitive data, see this documentation for more information.
These design decisions are made to help you get up and running as quickly as possible without overwhelming new users. As your experience and comfort with AnVIL grows, you will likely change your design to better match your unique needs e.g. enabling Authorization Domains when working with protected data.
2.1.3 Before You Start
- You will need a credit card or bank account to activate your free trial and get started. Don’t worry! You won’t be billed until you explicitly turn on automatic billing, but payment information is needed for verification purposes.
- Before setting up billing yourself, you may want to check with your institutional procurement office and see if they have a preferred account set-up method with Google (such as a third party reseller or an existing account).
- To add lab members, you will need to know the Google account they will use to access Terra. You can send lab members to the Data Analysts chapter for instructions on how they can sign up and start working on AnVIL. You can complete most setup steps without this information and then add them once you know the correct accounts.
2.1.4 Starting Setup
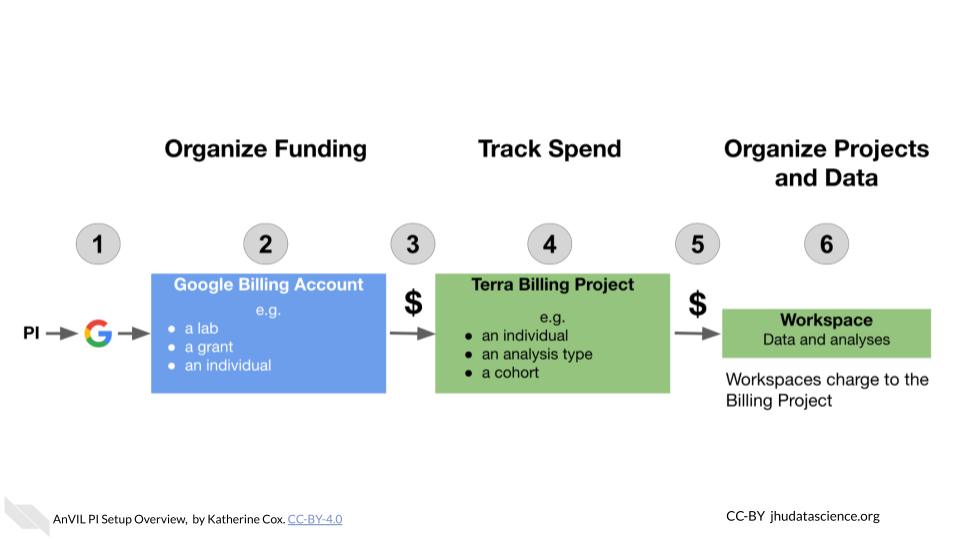
AnVIL uses Terra to run analyses. Terra operates on Google Cloud Platform (GCP), so you’ll pay for all storage and analysis costs through a Google account linked to Terra. The costs are the standard Google Cloud Platform fees for storing and moving data as well as executing an analysis. These costs are passed along through Terra without any markup.

- Create a Google account
- Set up Google Billing (and claim your free credits!).
- Add an administrator or viewer (optional)
- Link Terra to the Google Billing Account
- Create Terra Billing Projects
- Set budgets and alerts (optional, but highly recommended)
- Add users and Workspaces
2.1.5 Lab Management Roles
While there are many ways to configure your lab, this guide defines the following roles and responsibilities:
PI - The PI sets up the lab’s Google Cloud Account, creates its Google Billing Account(s), and Google Payment Method(s), links Terra with GCP, and invites Lab Managers to be Google Cloud “Billing Account Users.”
Lab Manager (Optional) - A Lab Manager creates or clones Terra Workspaces and manages who can use those Workspaces. The Lab Manager is also responsible for creating one or more Terra Billing Projects configuring GCP budgets and alerts. Importantly, lab managers control who can spend lab money and should have an understanding of Google Cloud Billing and Terra Billing Projects. Depending on your lab, the PI may choose to be the only Lab Manager, or may appoint trusted lab members to assist.
Data Analyst - A lab member who is granted write + can-compute access on one or more Terra Workspaces by a Lab Manager and who will run analyses in Terra. Data Analysts cannot share Terra Workspaces (this prevents them from enabling others to spend lab money).