Chapter 6 Billing
Modules about billing and Billing Projects on Google Cloud Platform and Terra.
6.1 Create Google Billing Account
Log in to the Google Cloud Platform console using your Google ID. Make sure to use the same Google account ID you use to log into Terra.
If you are a first time user, don’t forget to claim your free credits! If you haven’t been to the console before, once you accept the Terms of Service you will be greeted with an invitation to “Try for Free.”
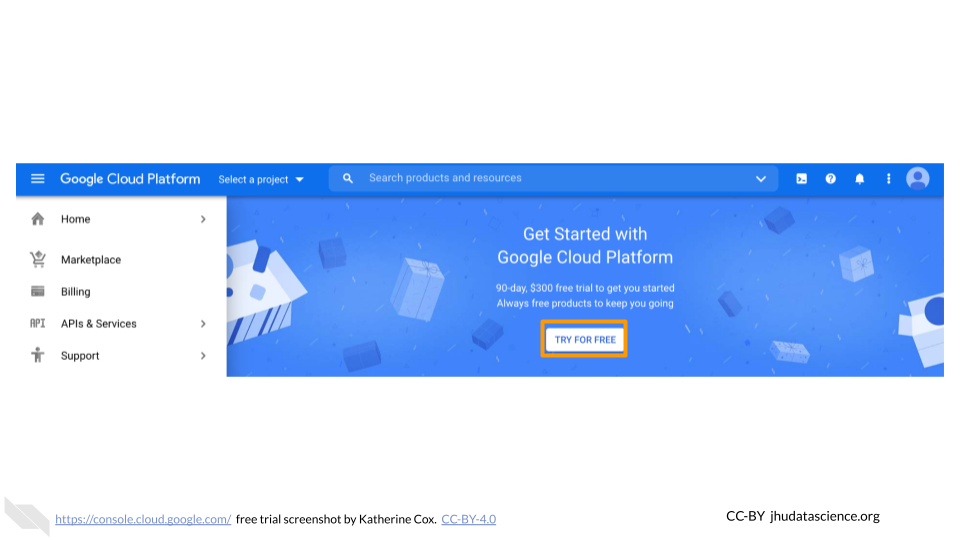
Follow the instructions to sign up for a Billing Account and get your credits.
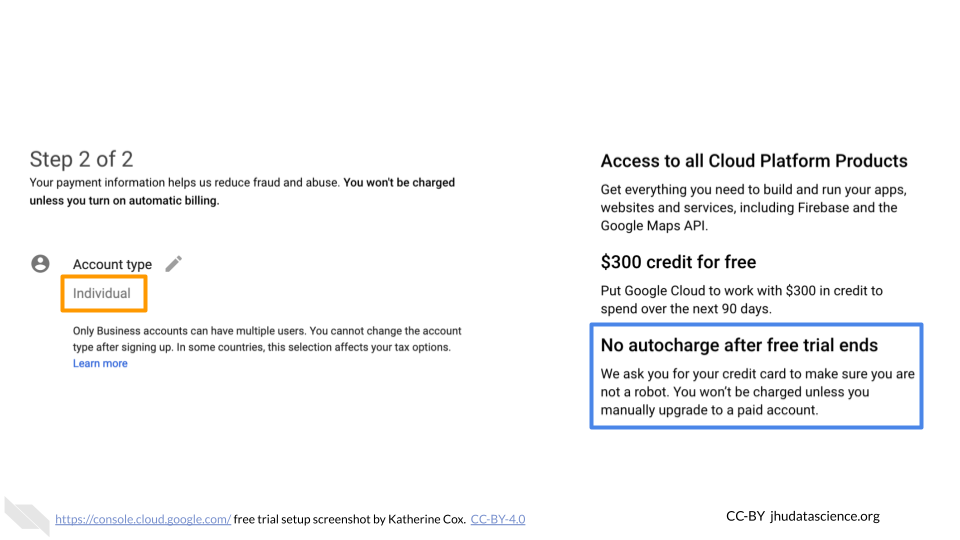
Choose “Individual Account”. This “billing account” is just for managing billing, so you don’t need to be able to add your team members. You will need to give either a credit card or bank account for security. Don’t worry! You won’t be billed until you explicitly turn on automatic billing.
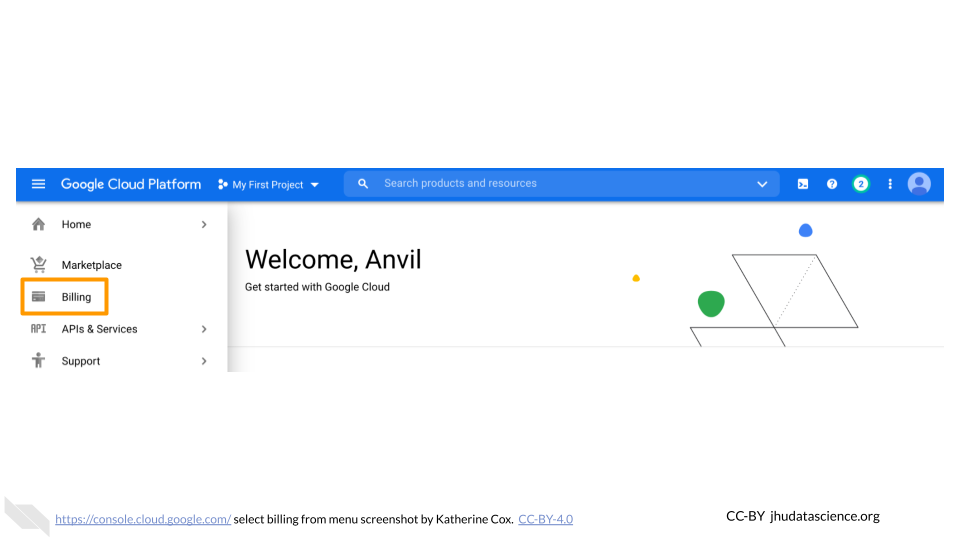
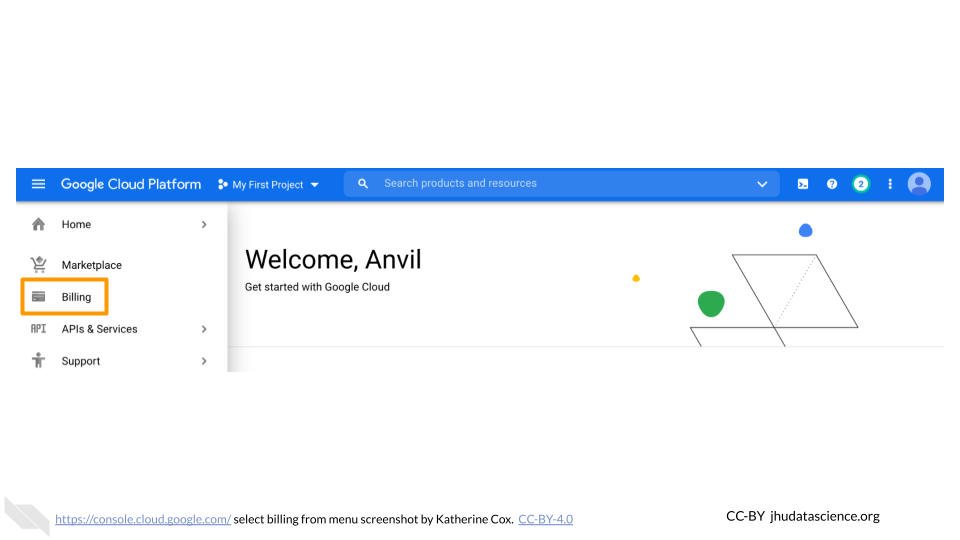
You can view and edit your new Billing Account, by selecting “Billing” from the left-hand menu, or going directly to the billing console console.cloud.google.com/billing
Clicking on the Billing Account name will allow you to manage the account, including accessing reports, setting alerts, and managing payments and billing.
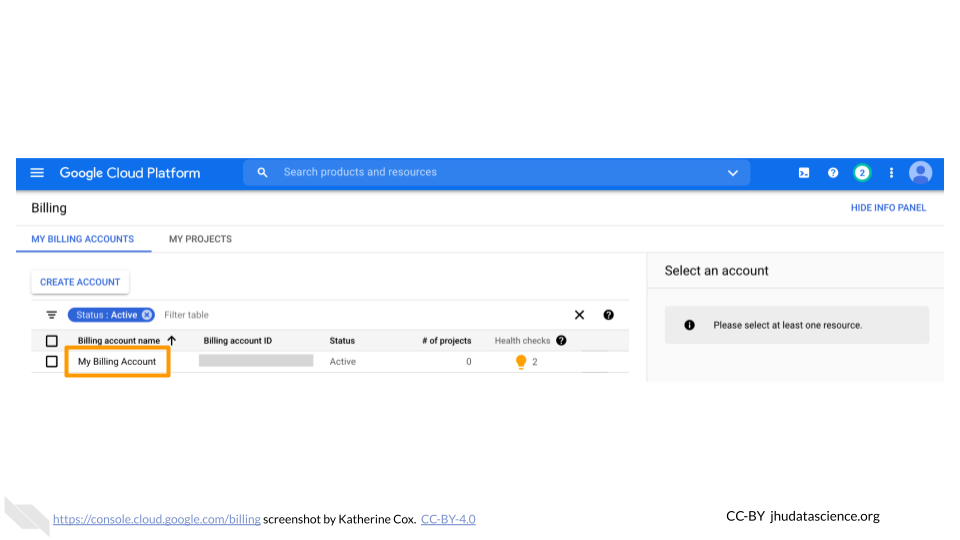
At any point, you can create additional Billing Accounts using the Create Account button. We generally recommend creating a new Billing Account for each funding source.
6.2 Add Terra to Google Billing Account
This gives Terra permission to create projects and send charges to the Google Billing Account, and must be done by an administrator of the Google Billing Account.
Terra needs to be added as a “Billing Account User”:
Log in to the Google Cloud Platform console using your Google ID.
Navigate to Billing
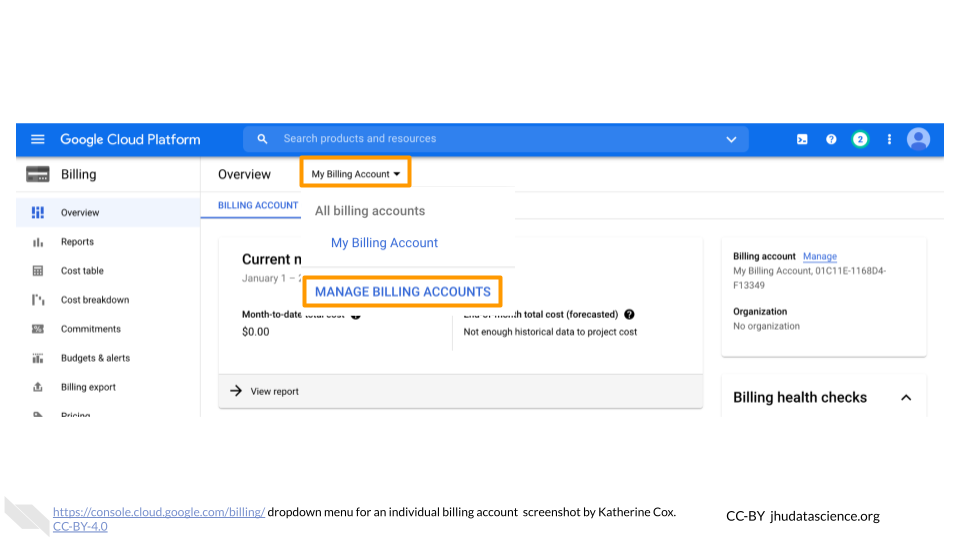
You may be automatically directed to view a specific Billing Account. If you see information about a single account rather than a list of your Billing Accounts, you can get back to the list by clicking “Manage Billing Accounts” from the drop-down menu.
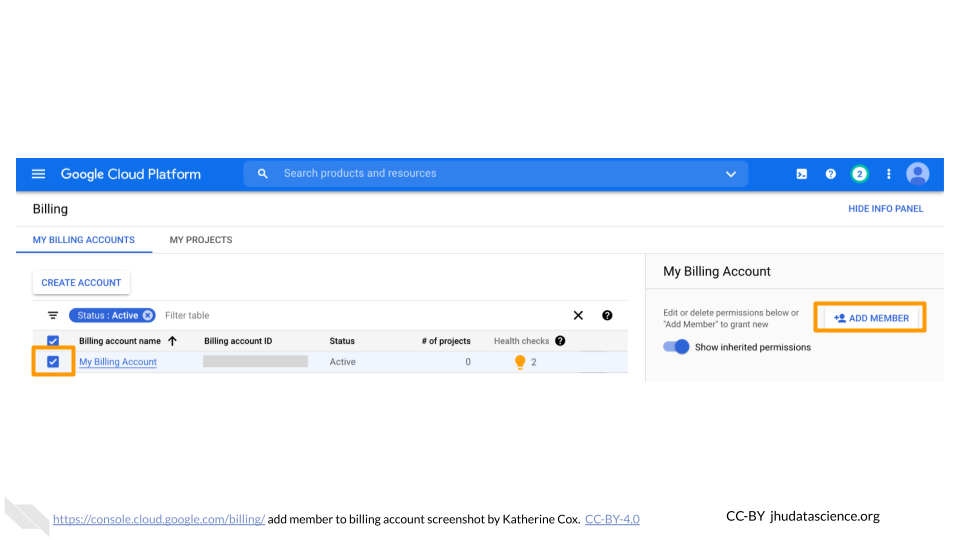
Check the box next to the Billing Account you wish to add Terra to, click “ADD MEMBER”.
Enter
terra-billing@terra.bioin the text box. In the drop-down menu, mouse over Billing, then choose “Billing Account User”.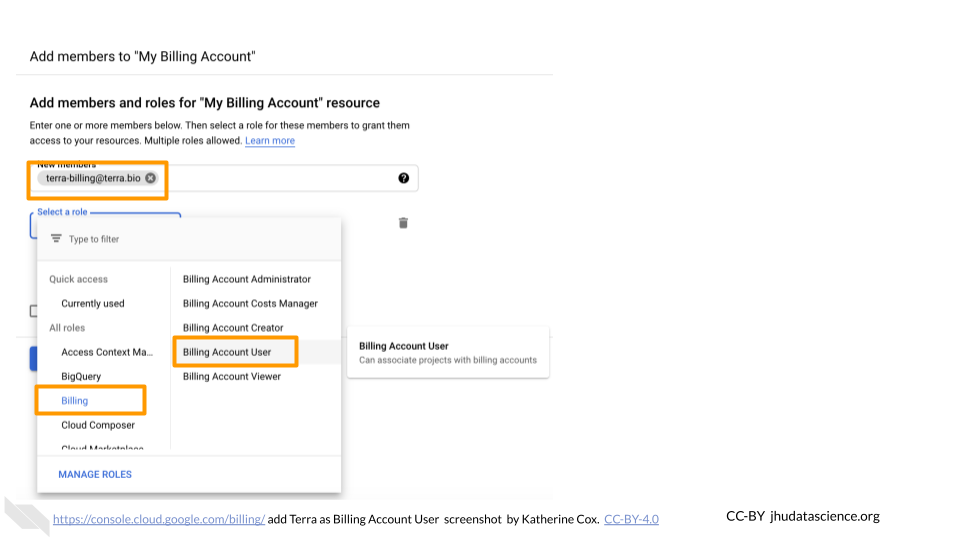
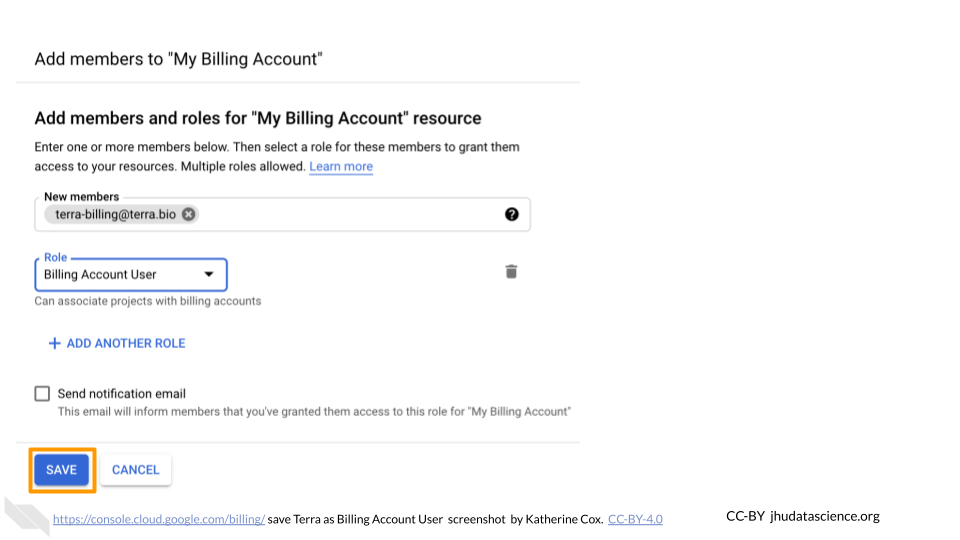
Click “SAVE”.
6.3 Add Members to Google Billing Account
Anyone you wish to add to the Billing Account will need their own Google ID.
To add a member to a Billing Project:
Log in to the Google Cloud Platform console using your Google ID.
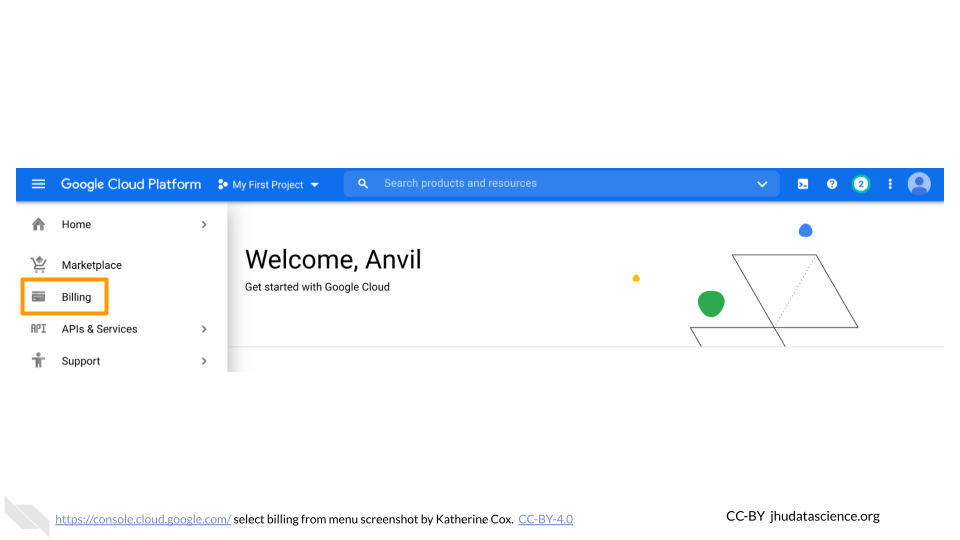
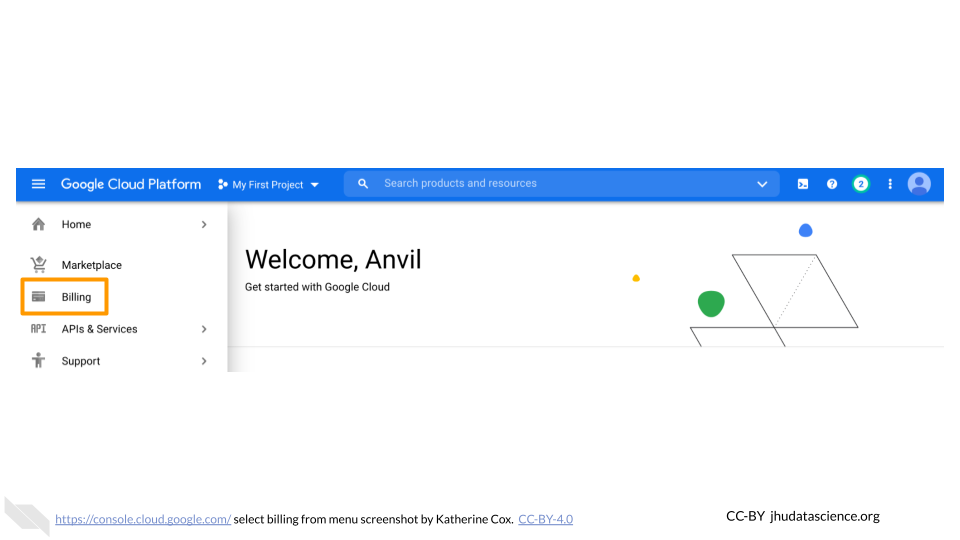
Navigate to Billing
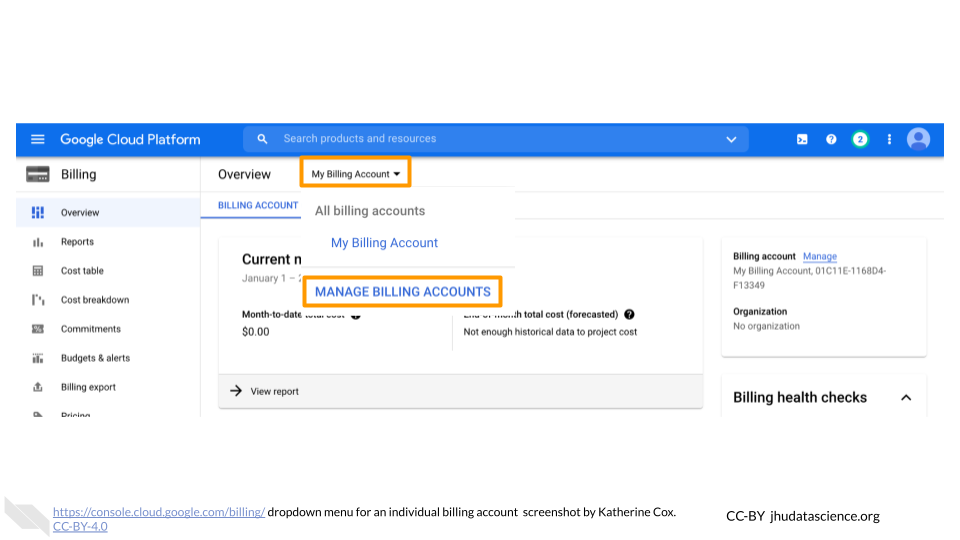
You may be automatically directed to view a specific Billing Account. If you see information about a single account rather than a list of your Billing Accounts, you can get back to the list by clicking “Manage Billing Accounts” from the drop-down menu.
Check the box next to the Billing Account you wish to add a member to, click “ADD MEMBER”.
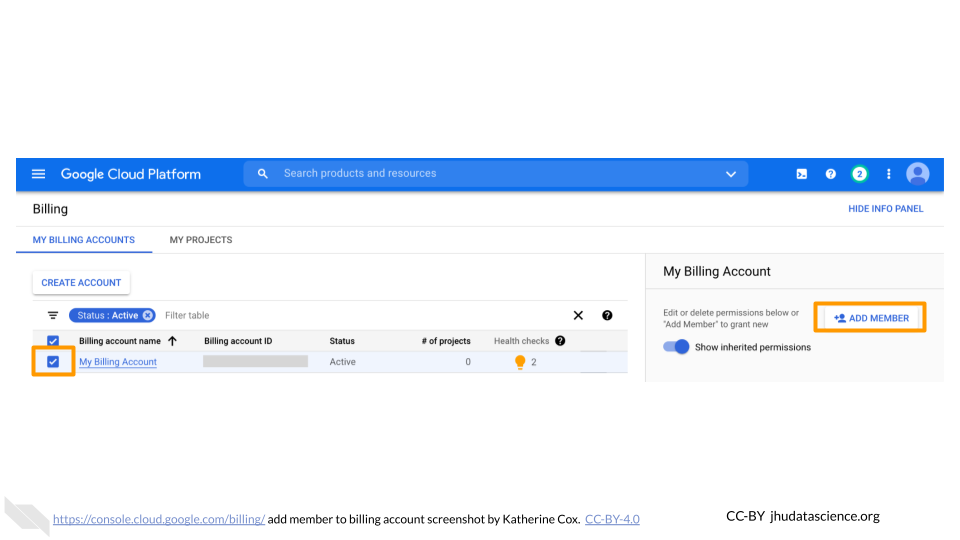
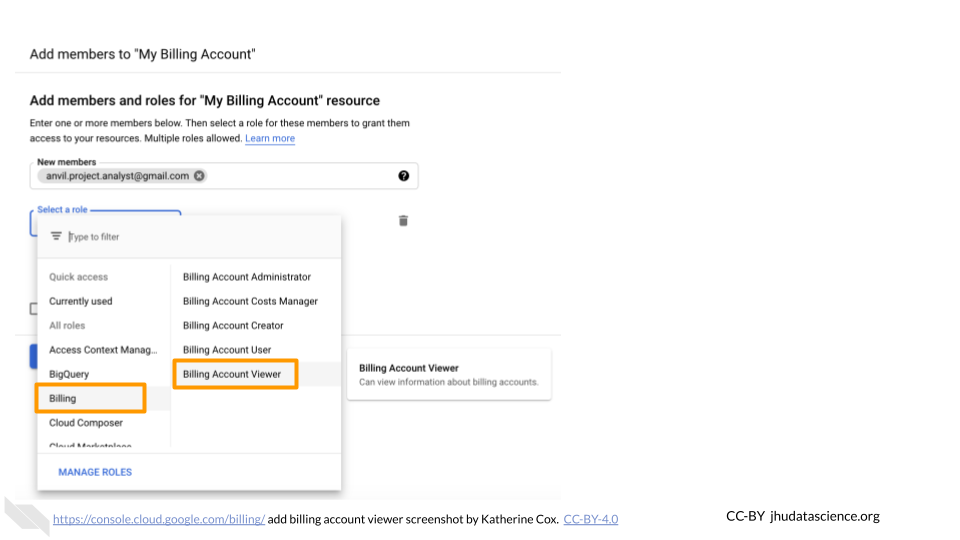
Enter their Google ID in the text box. In the drop-down menu, mouse over Billing, then choose the appropriate role.
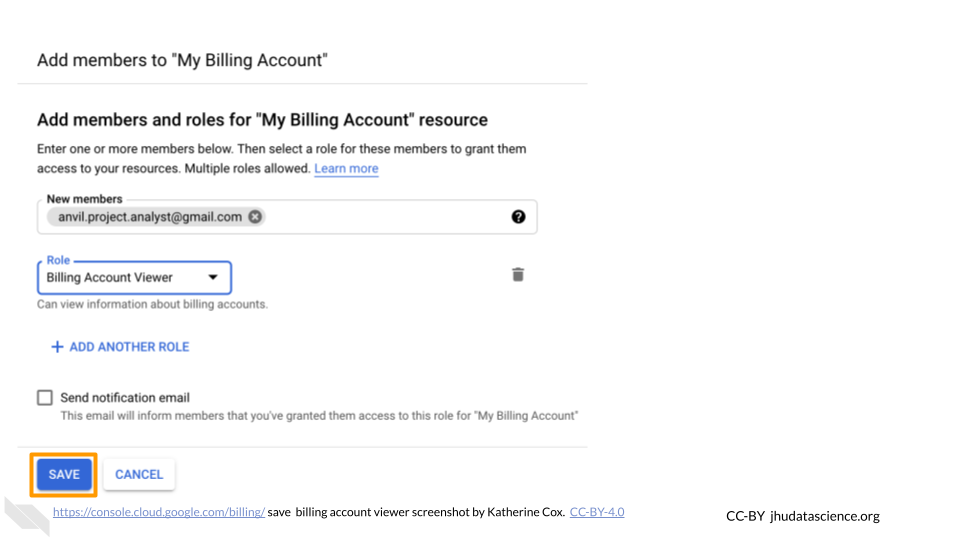
Click “SAVE”.
6.4 Set Alerts for Google Billing
Log in to the Google Cloud Platform console using the Google ID associated with your Google Cloud projects.
Open the dropdown menu on the top left and click on Billing.
You may be automatically directed to view a specific Billing Account. If you see information about a single account (and it’s not the one you’re interested in), you can get back to the list of all your Billing Accounts by clicking “Manage Billing Accounts” from the drop-down menu.
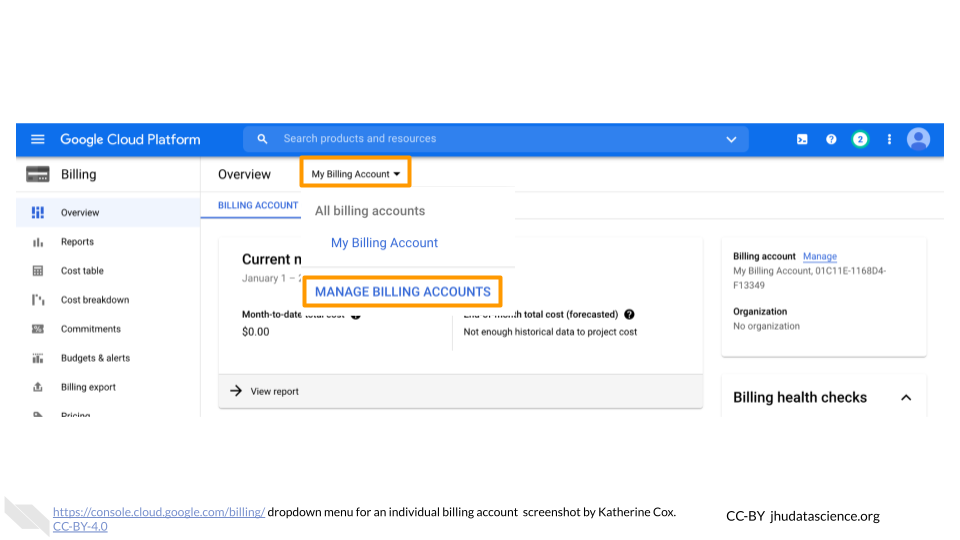
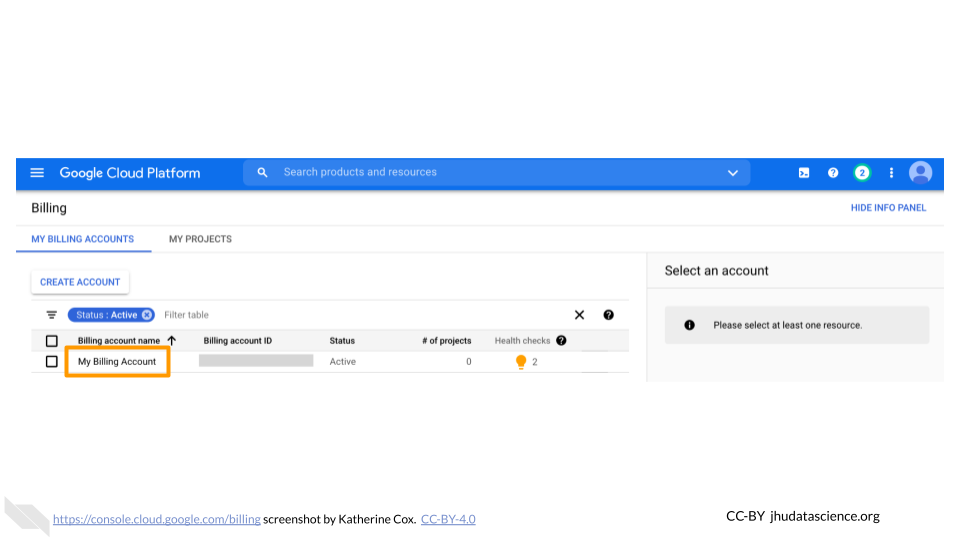
Click on the name of the Billing Account you want to set alerts for.
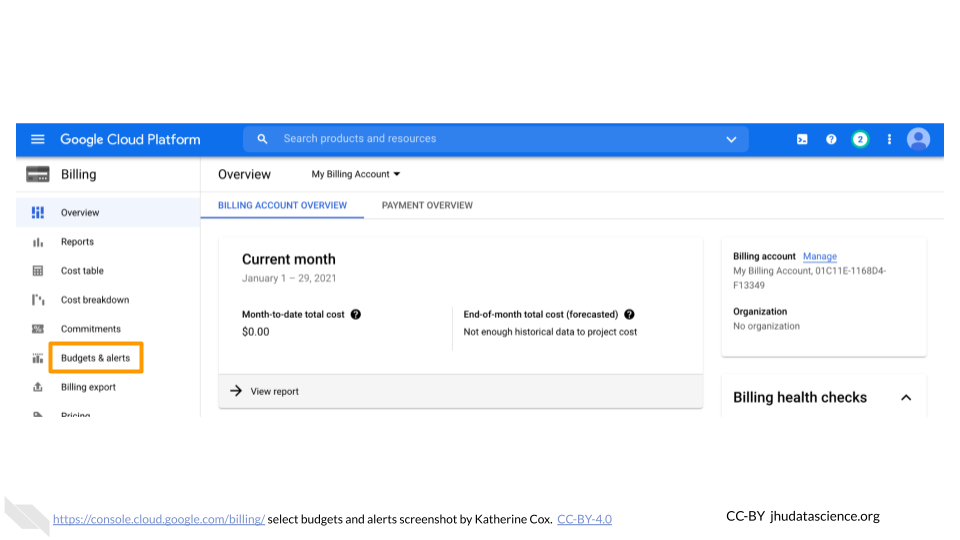
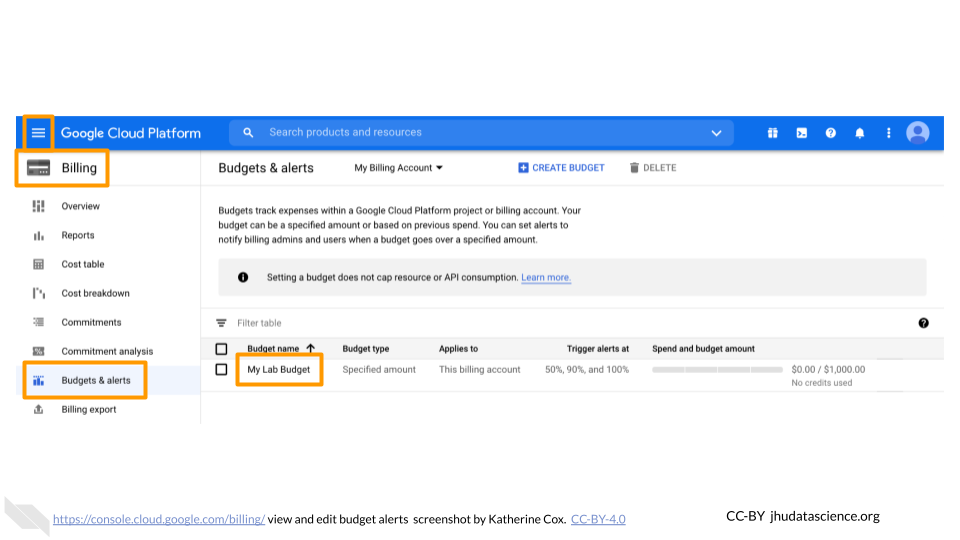
In the left-hand menu, click “Budgets & alerts”.
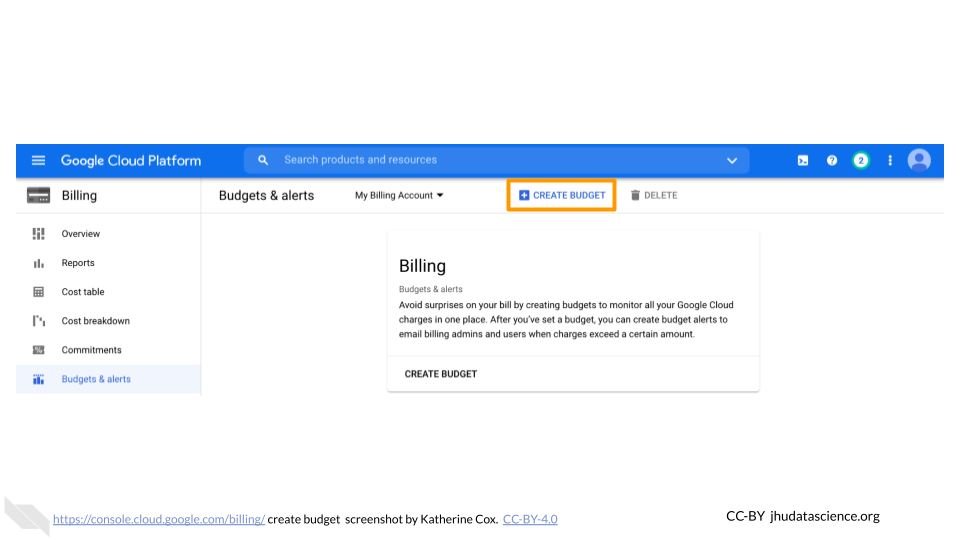
Click the “Create Budget” tab.
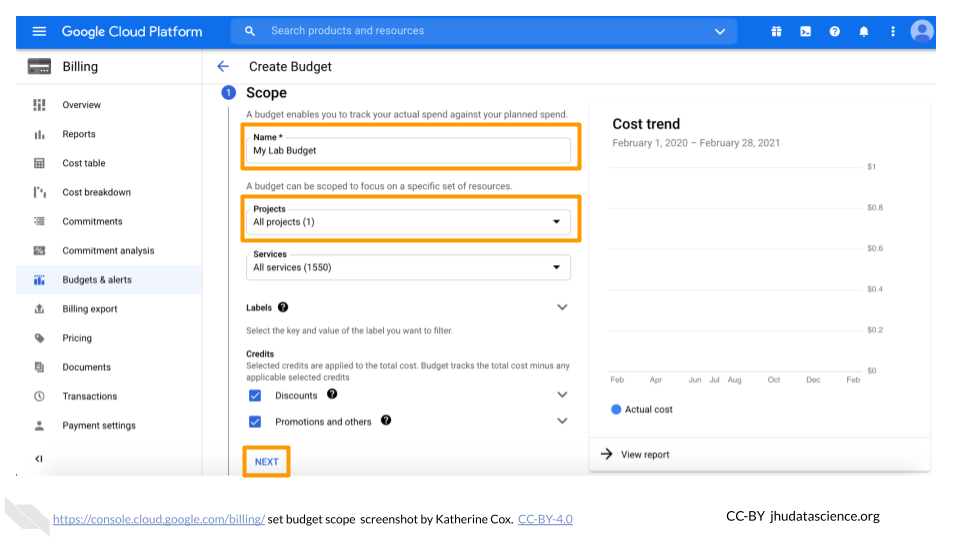
Enter a name for your budget, and then choose which projects you want to monitor. Then click “Next”.
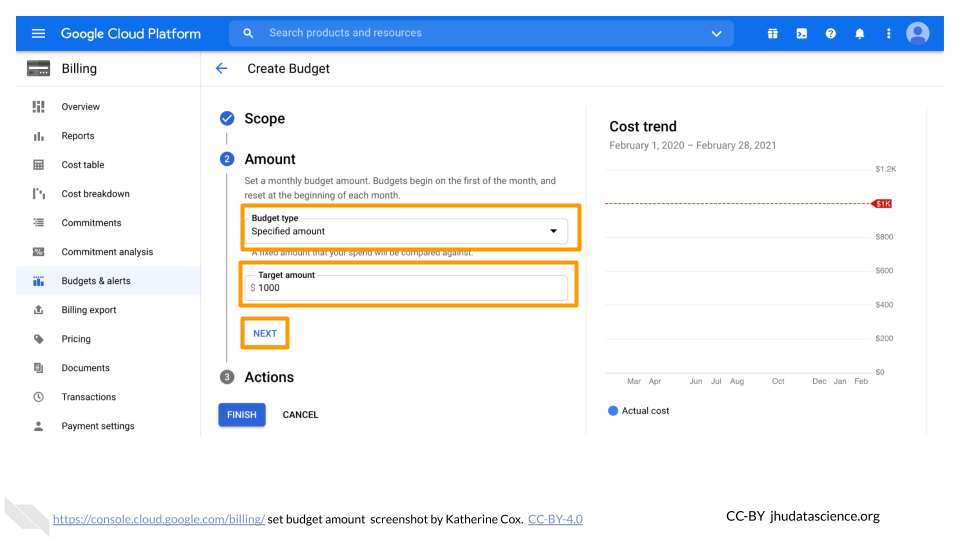
For Budget Type, select “Specified amount”. Enter the total budget amount for the month (you will set alerts at different thresholds in the next step). Click “Next” (do not click “Finish”).
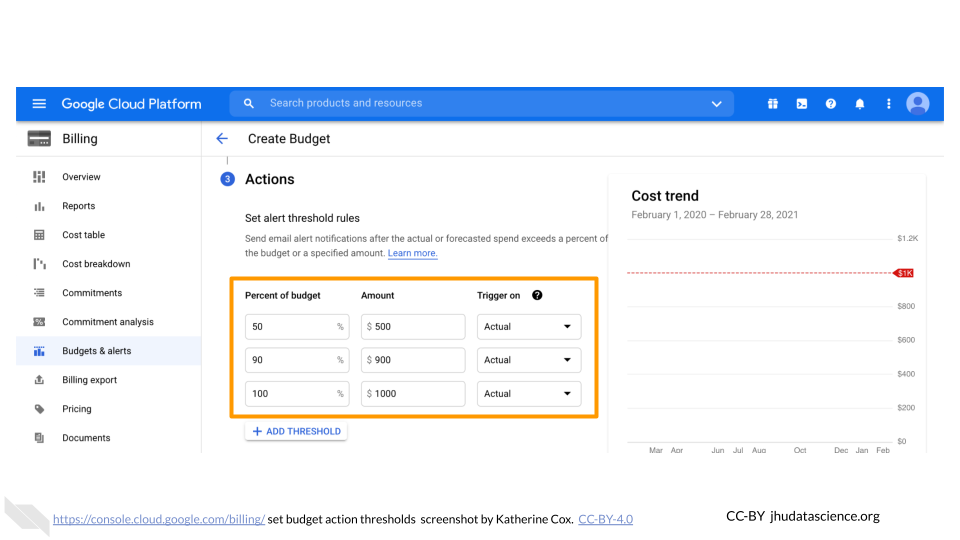
Enter the threshold amounts where you want to receive an alert. We recommend starting with 50% and 90%. You can set other alerts if you prefer.
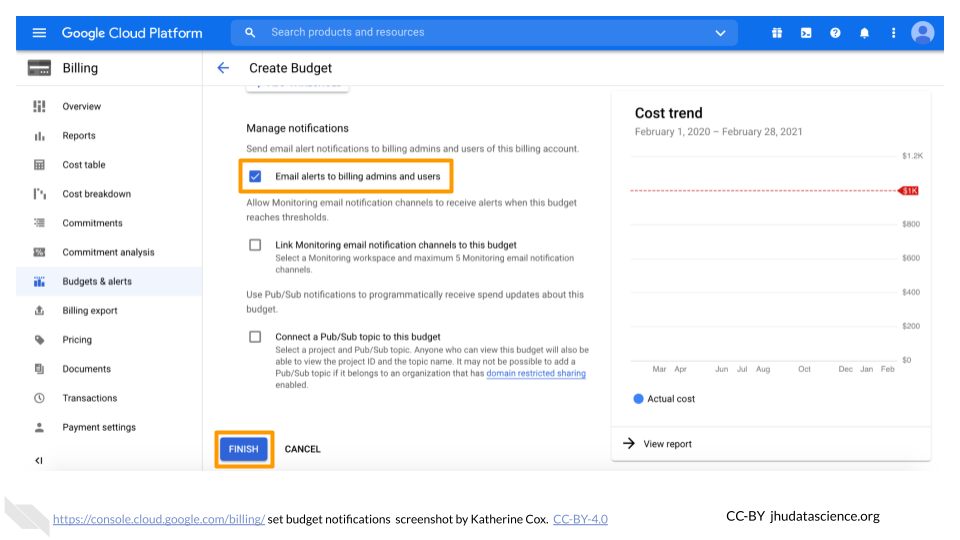
Check the box for “Email alerts to billing admins and users”, then click “Finish”. Now you (as the owner and admin), along with anyone you added with admin or user privileges (e.g. lab managers) will receive alerts when your lab members reach the specified spending thresholds. These emails will be sent to the Gmail accounts associated with the Billing Account.
You can edit your budgets at any time by going to Billing > Budgets & alerts, and clicking on the name of the budget you want to edit.
6.5 View Spend for Google Billing
You can always check your current spend through the Google Billing console, but remember
- There is a reporting delay (~1 day), so you cannot immediately see what an analysis cost
- Costs are reported at the level of Workspaces, so if there are multiple people using a Workspace, you will not be able to determine which of them was responsible for the charges.
The Google Billing console displays information by Billing Account. To view spending:
Log in to the Google Cloud Platform console using the Google ID associated with your Google Cloud projects.
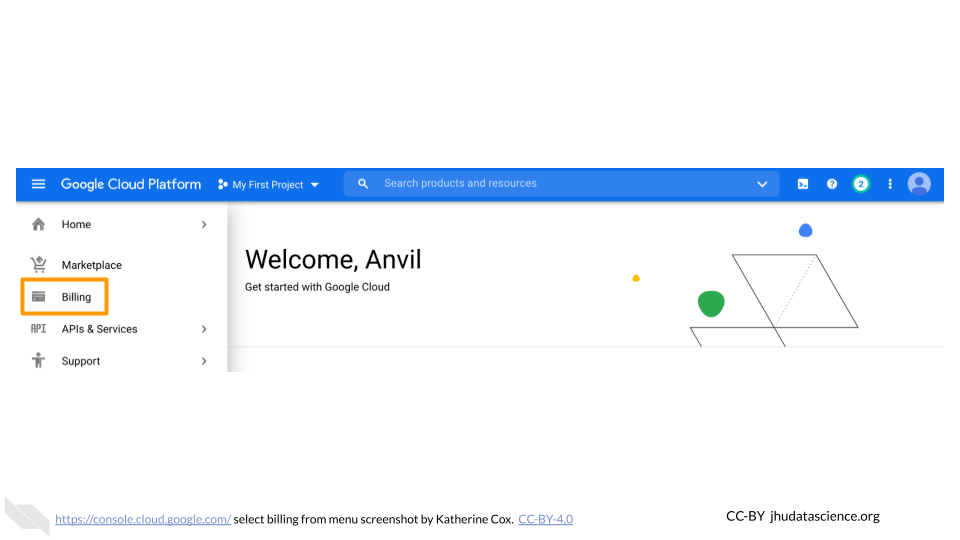
Open the dropdown menu on the top left and click on Billing.
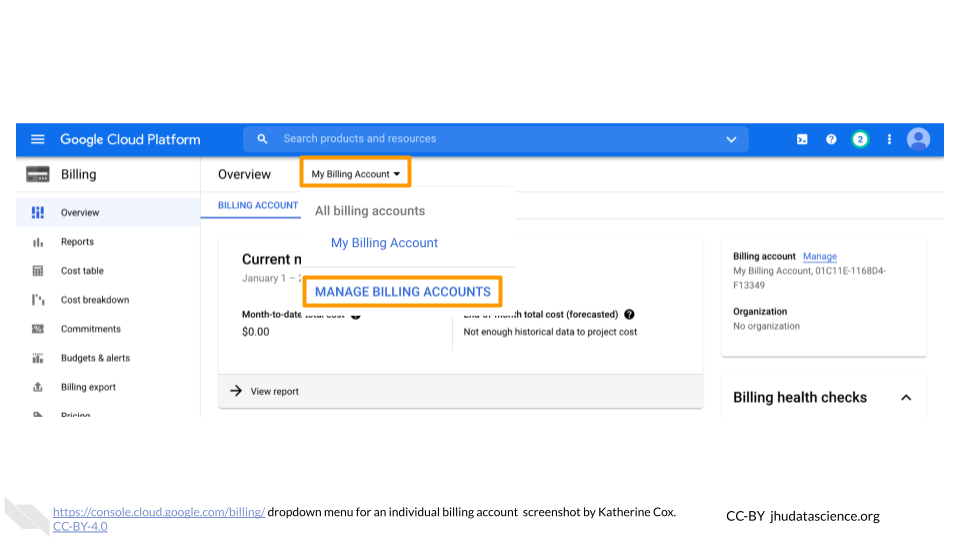
You may be automatically directed to view a specific Billing Account. If you see information about a single account (and it’s not the one you’re interested in), you can get back to the list of all your Billing Accounts by clicking “Manage Billing Accounts” from the drop-down menu.
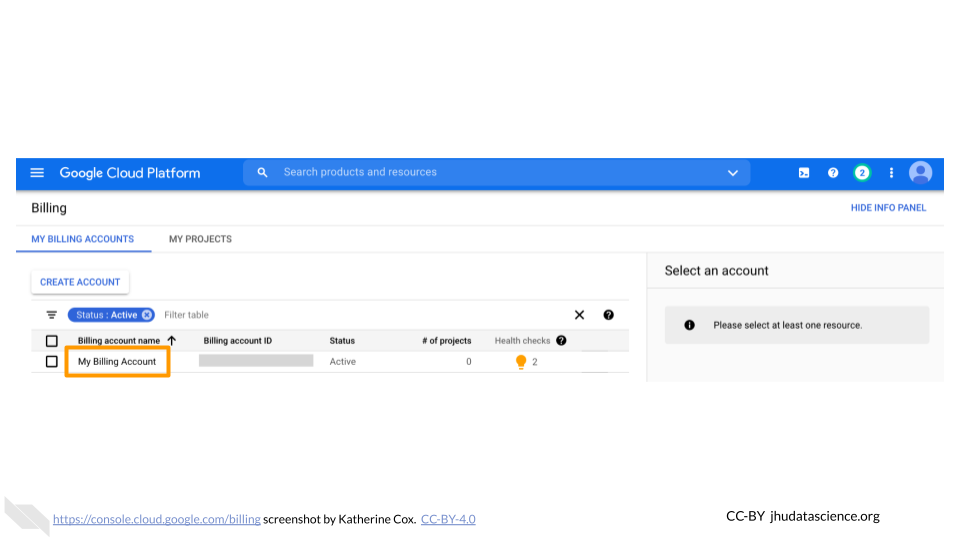
Click on the name of the Billing Account for the project you want to view.
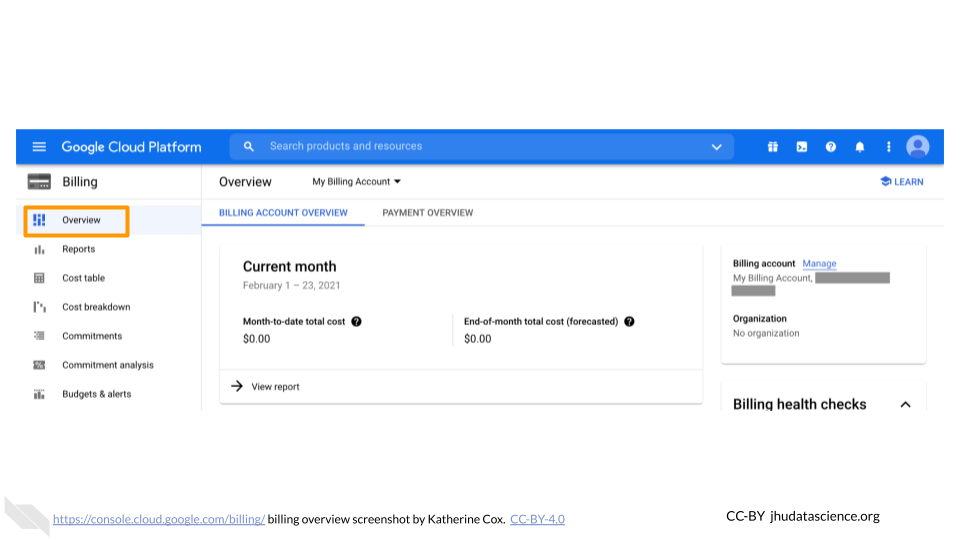
Look at the top of the Overview tab to see your month-to-date spending.
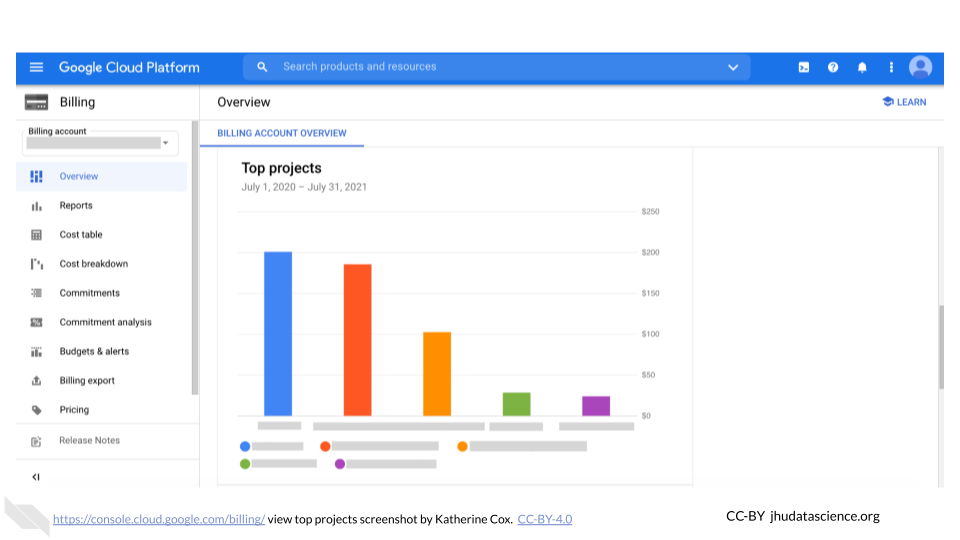
Scroll further down the Overview tab to show your top projects.
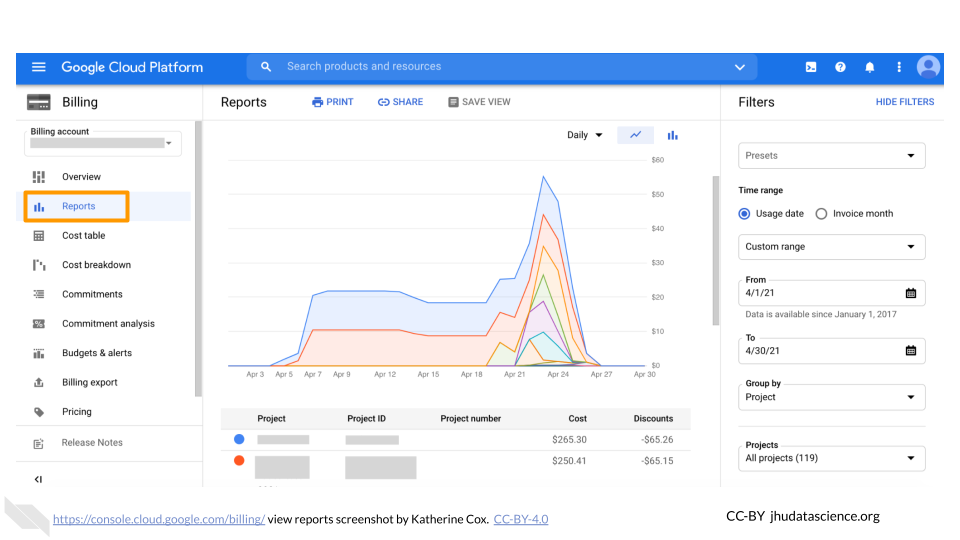
Click on the Reports tab to see more detailed information about each of your projects. This is probably the most useful tab for exploring costs of individual projects over time.
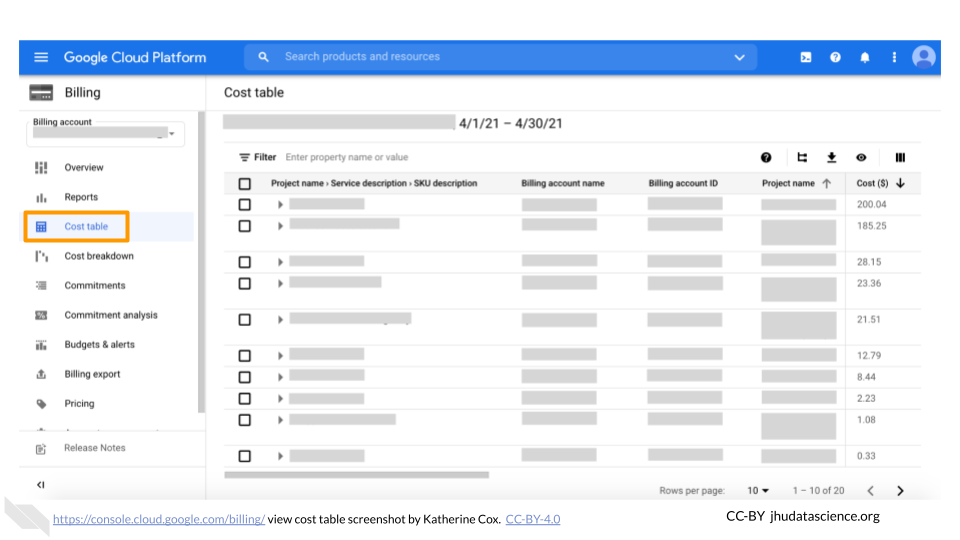
Click on the Cost table tab to obtain a convenient table of spending per project.
6.6 Create Terra Billing Project
Launch Terra and sign in with your Google account. If this is your first time logging in to Terra, you will need to accept the Terms of Service.
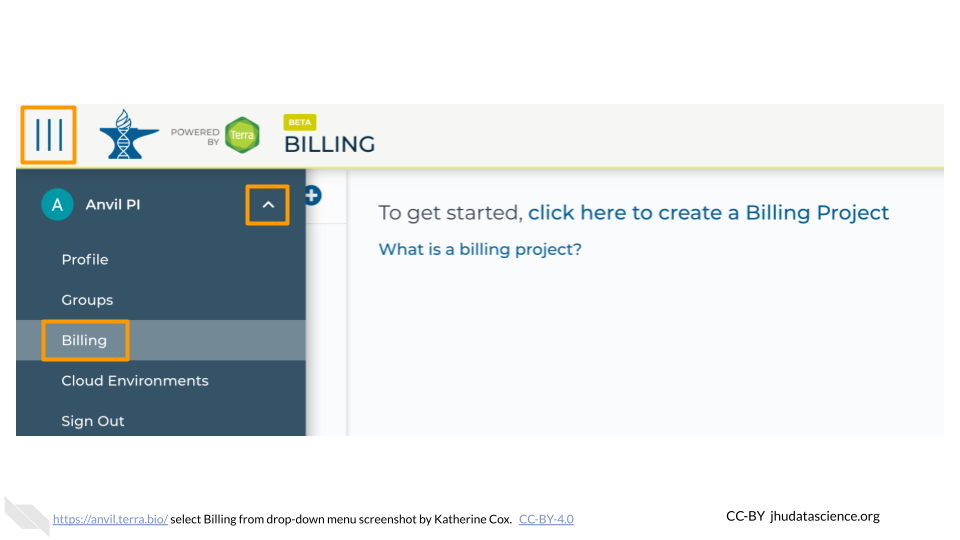
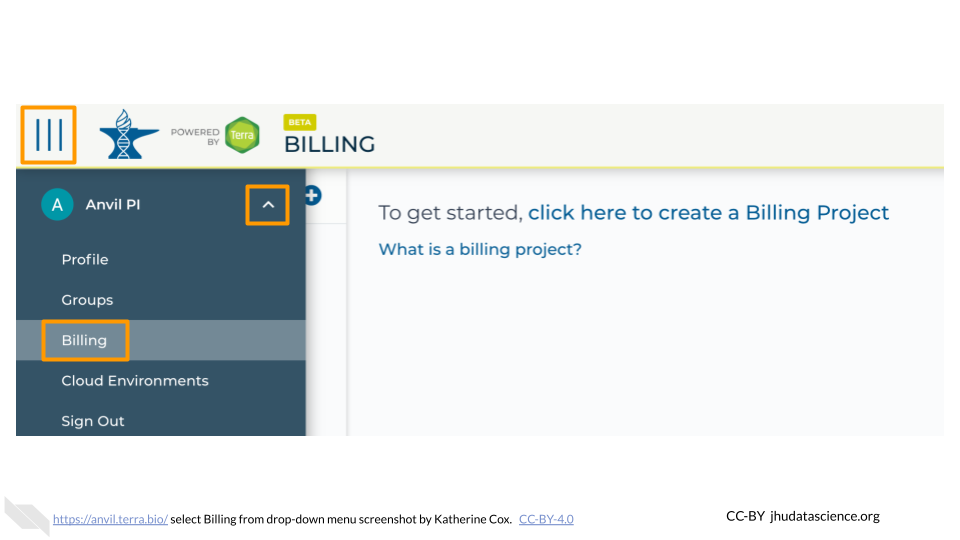
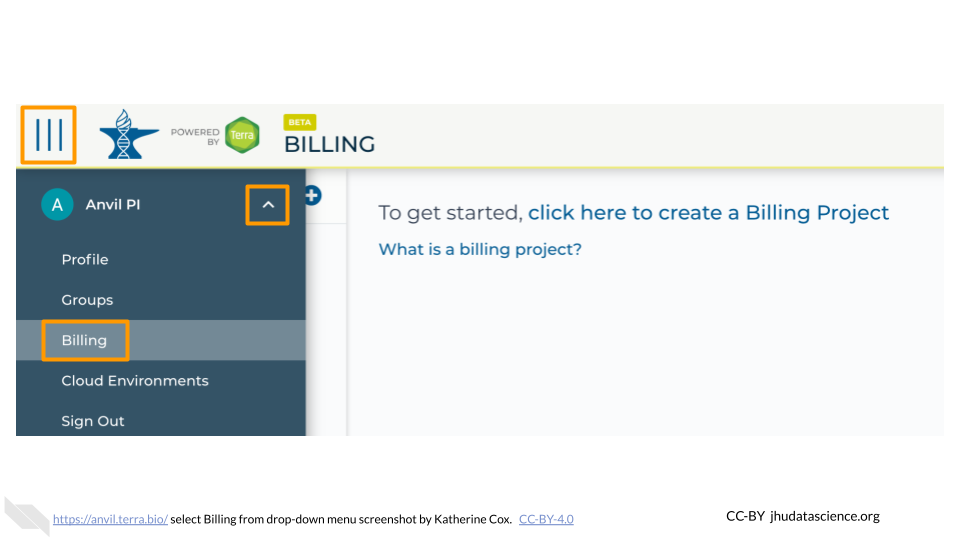
In the drop-down menu on the left, navigate to “Billing”. Click the triple bar in the top left corner to access the menu. Click the arrow next to your name to expand the menu, then click “Billing”. You can also navigate there directly with this link: https://anvil.terra.bio/#billing
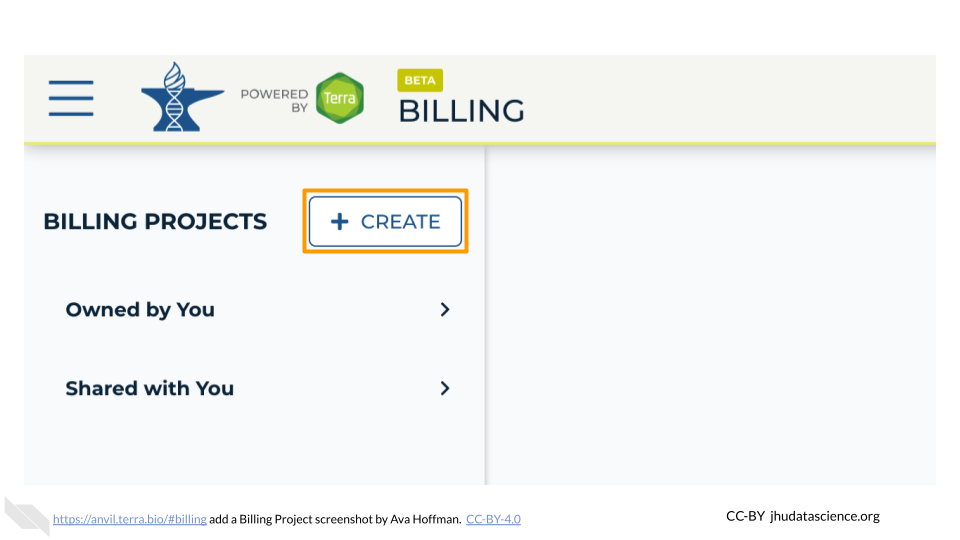
On the Billing page, click the “+ CREATE” button to create a new Billing Project. Select GCP Billing Project (Google’s Platform). If prompted, select the Google account to use and give Terra permission to manage Google Cloud Platform billing accounts.
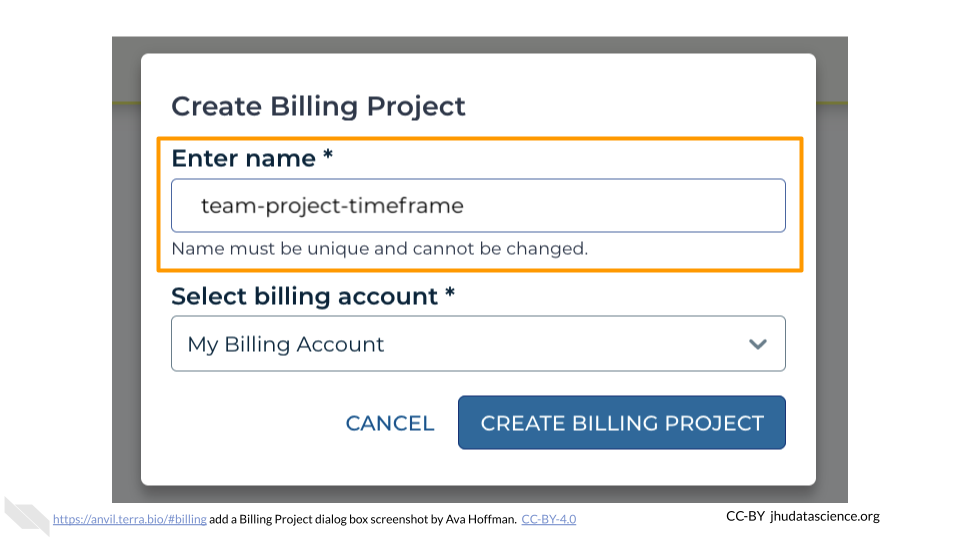
Enter a unique name for your Terra Billing Project and select the appropriate Google Billing Account. The name of the Terra Billing Project must:
- Only contain lowercase letters, numbers and hyphens
- Start with a lowercase letter
- Not end with a hyphen
- Be between 6 and 30 characters
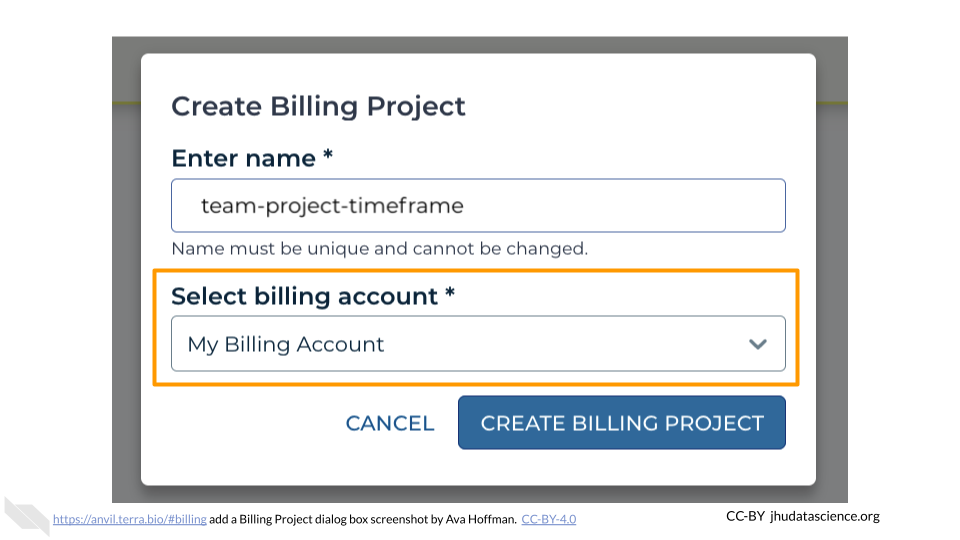
Select the Google Billing Account to use. All activities conducted under your new Terra Billing Project will charge to this Google Billing Account. If prompted, give Terra permission to manage Google Cloud Platform billing accounts.
Click “Create”.
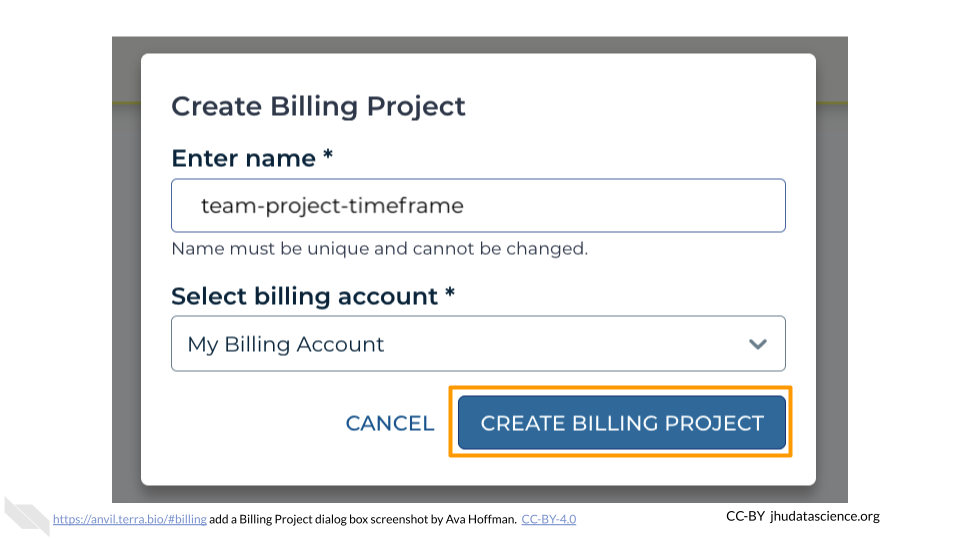
Your new Billing Project should now show up in the list of Billing Projects Owned by You. You can add additional members or can modify or deactivate the Billing Project at any time by clicking on its name in this list.
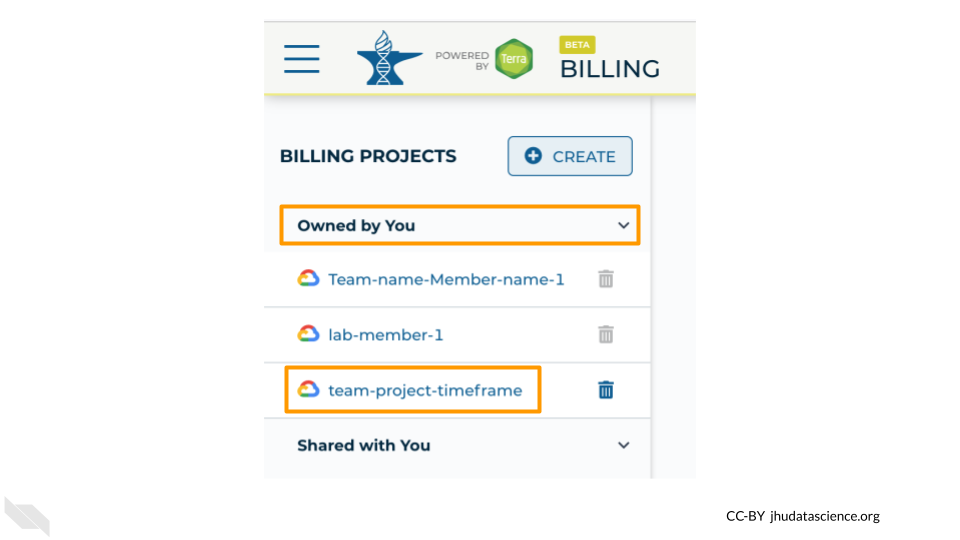
The page doesn’t always update as soon as the Billing Project is created. If it’s been a couple of minutes and you don’t see a change, try refreshing the page.
6.7 Add Member to Terra Billing Project
Launch Terra and sign in with your Google account.
In the drop-down menu on the left, navigate to “Billing”. Click the triple bar in the top left corner to access the menu. Click the arrow next to your name to expand the menu, then click “Billing”. You can also navigate there directly with this link: https://anvil.terra.bio/#billing
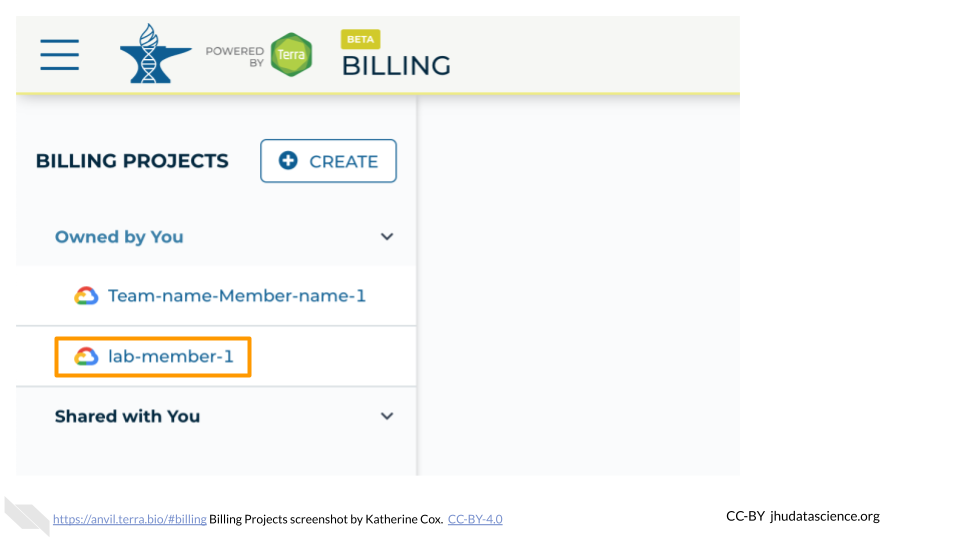
Click “Owned by You” and find the Billing Project. If you do not see the Billing Project in this list, then you are not an Owner and do not have permission to add members.
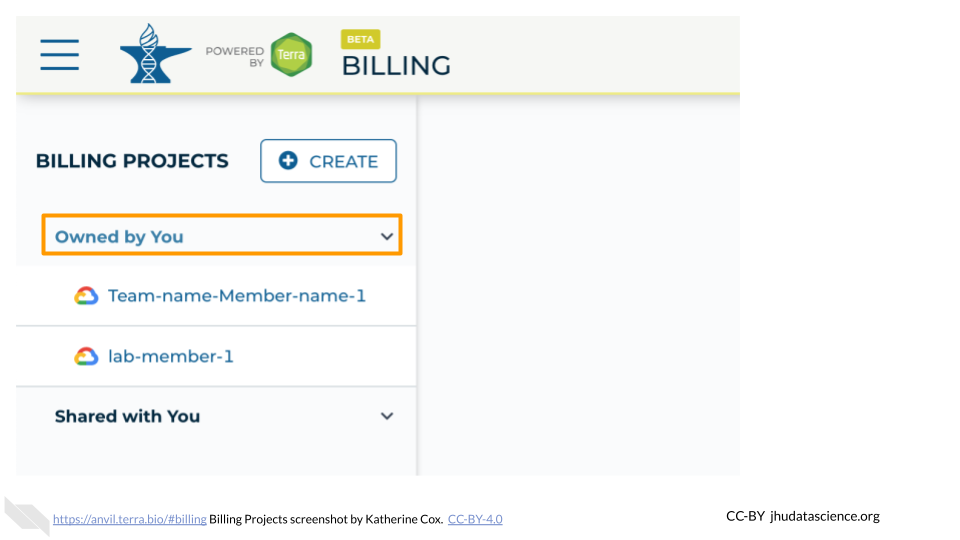
Click on the name of the Billing Project.
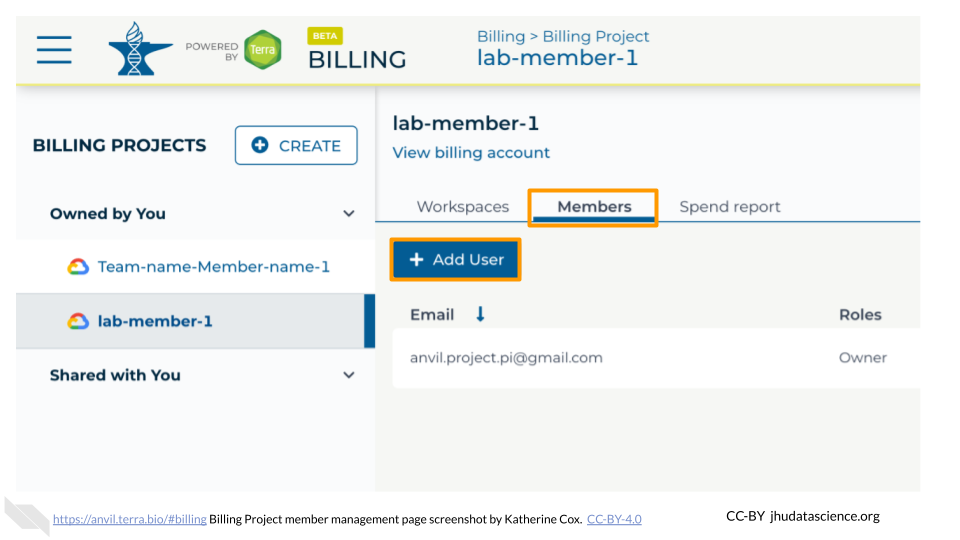
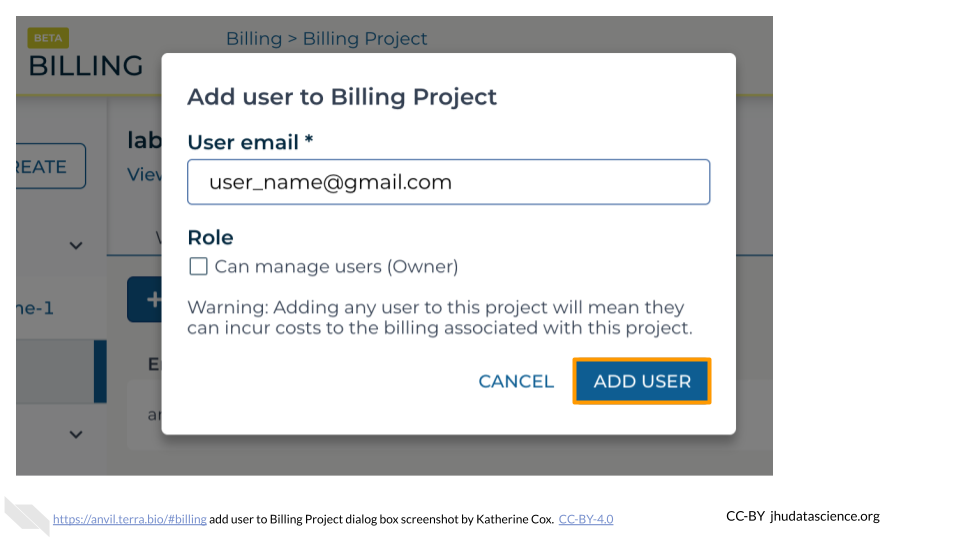
Click on the “Members” tab to view and manage members. Then click the “Add User” button.
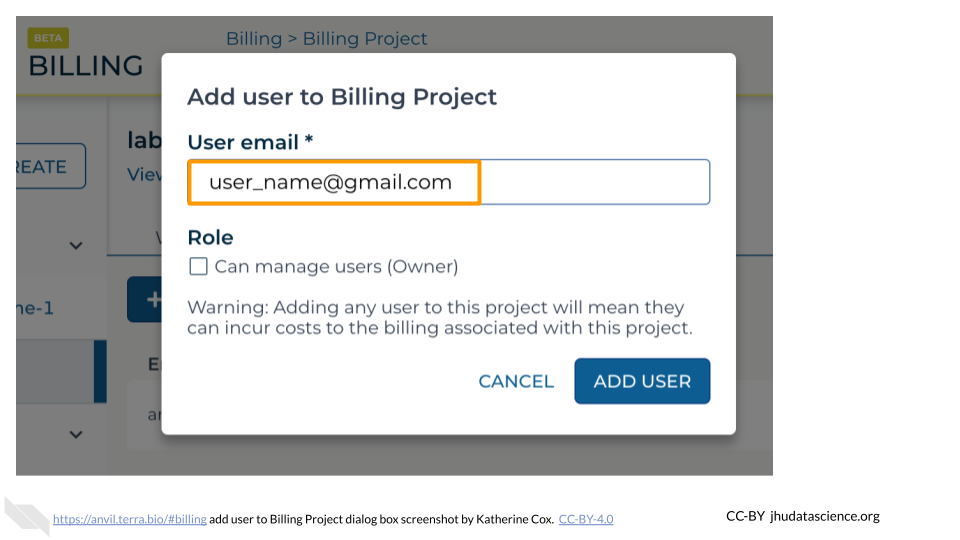
Enter the email address of the user or group you’d like to add the the Billing Project.
- If adding an individual, make sure to enter the account that they use to access AnVIL.
- If adding a Terra Group, use the Group email address, which can be found on the Terra Group management page.
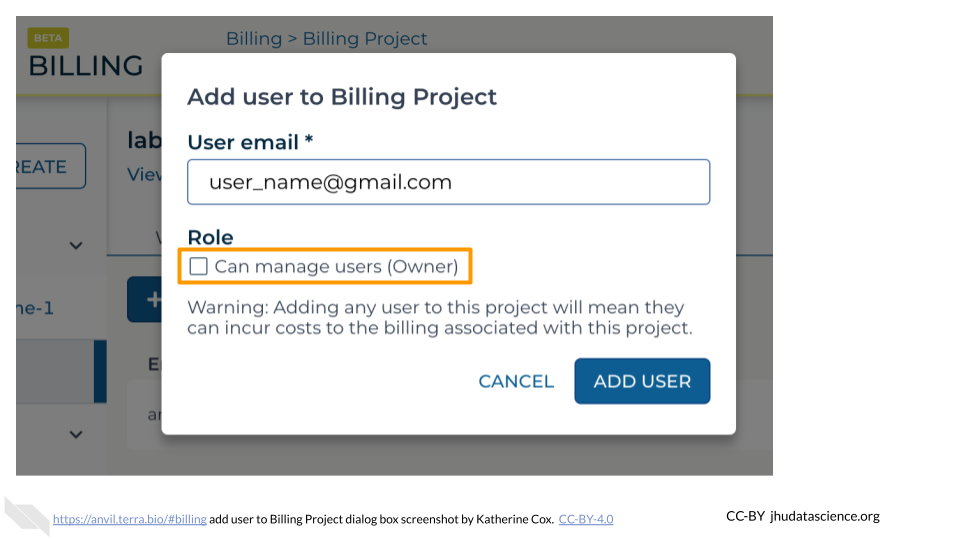
If this user or group will need to add and remove other users of the Billing Project, check the Owner box. Otherwise leave it unchecked.
- It’s often a good idea to have at least one other Owner of a Billing Project in order to avoid getting locked out, in case the original owner leaves or loses access to their account.
Click “ADD USER”.
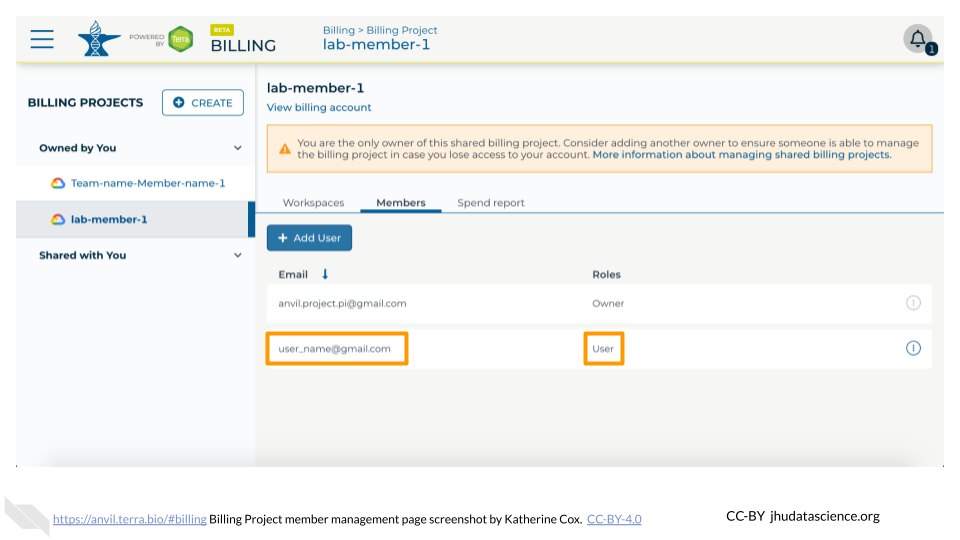
You should now see the user or group listed in the Billing Project members, along with the appropriate role. They should now be able to use the Billing Project to fund work on AnVIL.
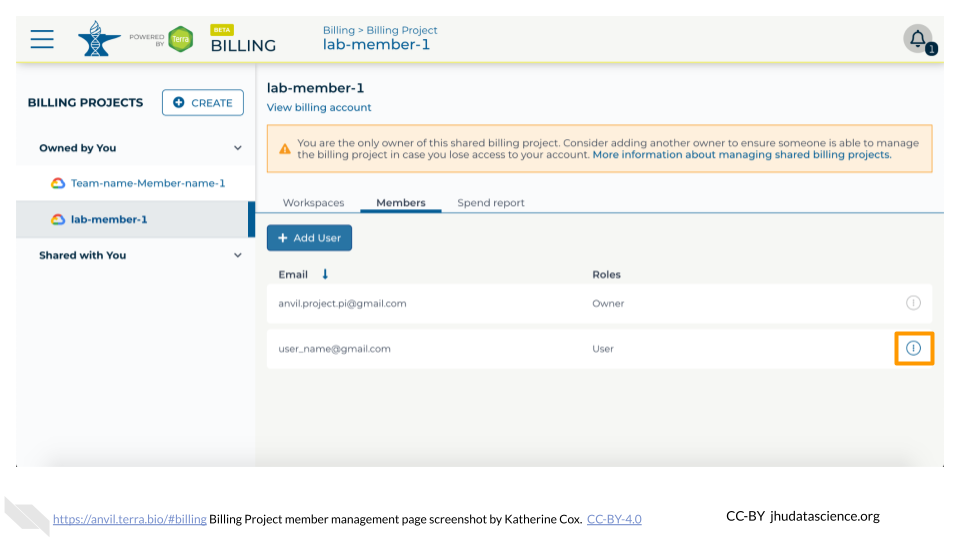
If you need to remove members or modify their roles, you can do so at any time by clicking the teardrop button next to their name.
6.8 Disable Terra Billing Project
By default this module includes a warning to make sure people understand they will lose access to their Workspace buckets. You can remove the warning from this module by setting AnVIL_module_settings$warning to FALSE before running cow::borrow_chapter:
AnVIL_module_settings <- list(
  warning = FALSE
)
cow::borrow_chapter(
  doc_path = "child/_child_terra_billing_project_disable.Rmd",
  repo_name = "jhudsl/AnVIL_Template"
)
Disabling a Billing Project makes Workspace contents inaccessible!
Disabling a Billing Project disables funding to all Workspaces funded by the Billing Project. You will be unable to compute in these Workspaces, and you will lose access to any data stored in the Workspace buckets. It is sometimes possible to restore access by reactivating billing, but Google makes no promises about whether or how long the data will be recoverable.
Make sure everyone with Workspaces funded by the Billing Project has saved anything they want to keep in another location before disabling the Billing Project.
To disable a Terra Billing Project (i.e. remove the Google Billing Account that funds the Terra Billing Project):
Launch Terra and sign in with your Google account.
In the drop-down menu on the left, navigate to “Billing”. Click the triple bar in the top left corner to access the menu. Click the arrow next to your name to expand the menu, then click “Billing”. You can also navigate there directly with this link: https://anvil.terra.bio/#billing
Click “Owned by You” and find the Billing Project. If you do not see the Billing Project in this list, then you are not an Owner and do not have permission to add members.
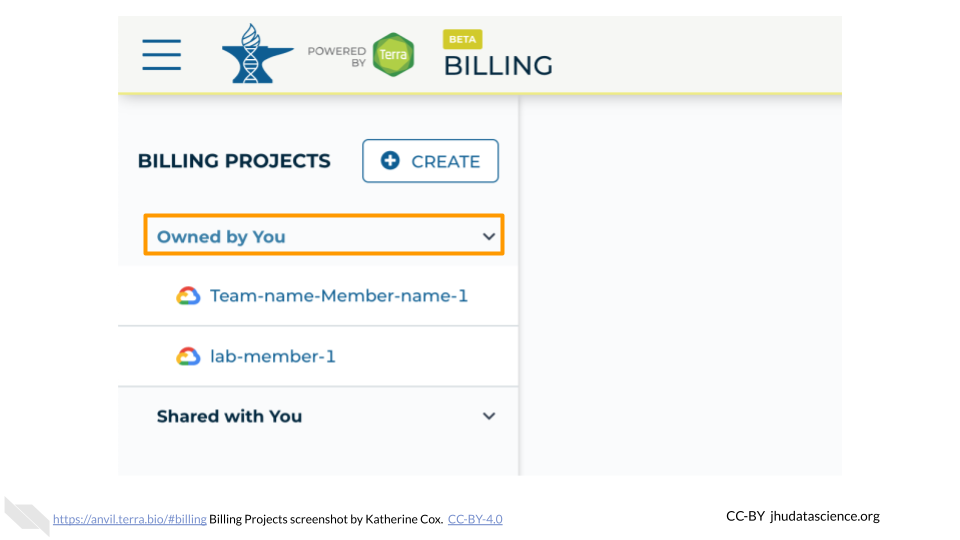
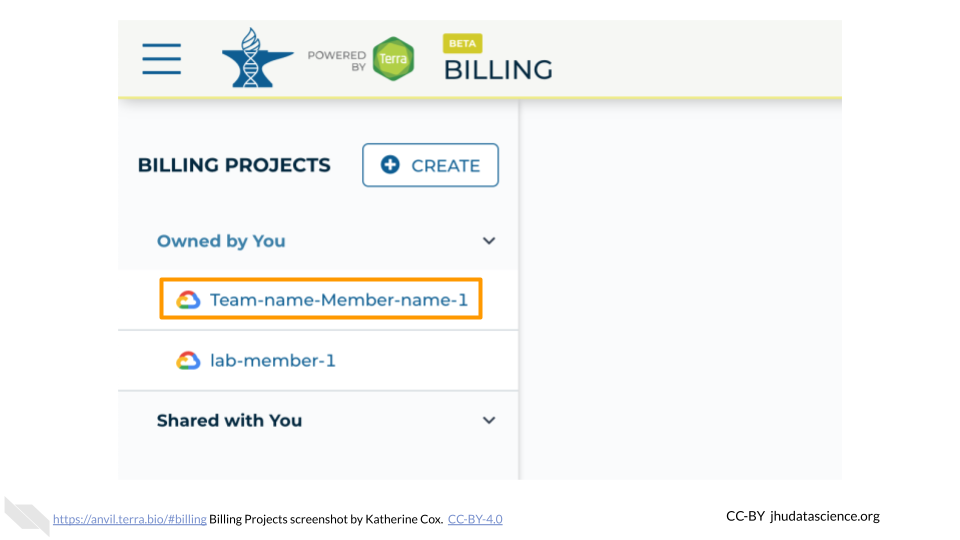
Click on the name of the Billing Project.
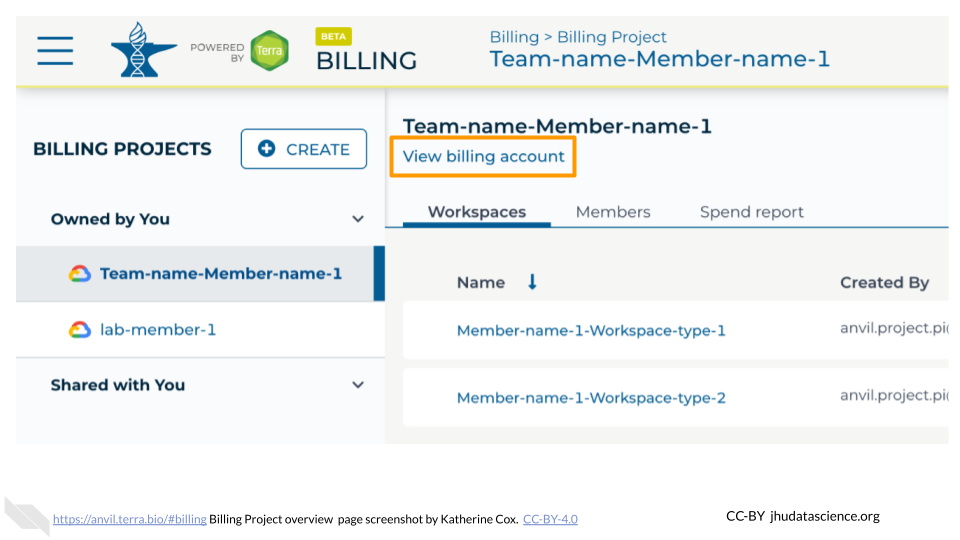
If you don’t see information about the Billing Account, click on “View billing account” to expand the Billing Account information. You may be prompted to enter your login information again.
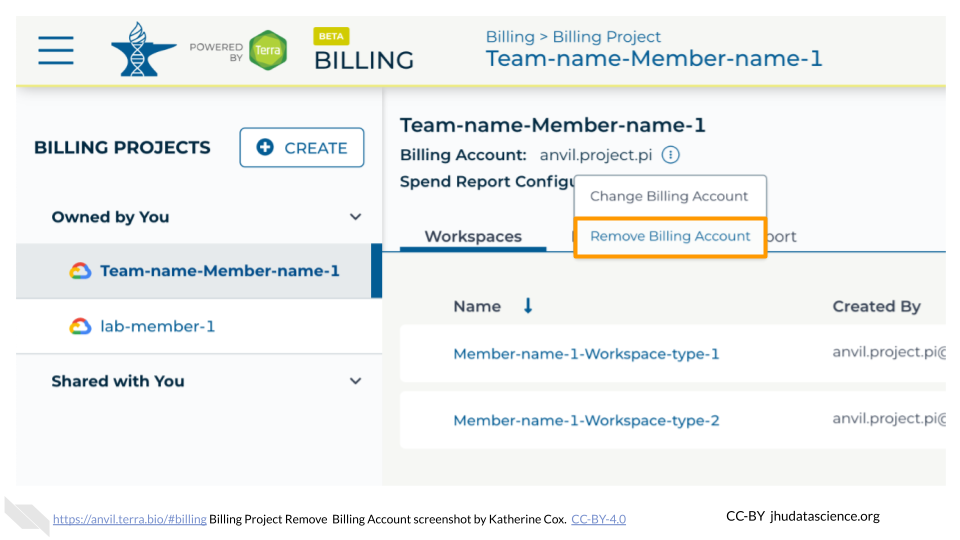
You should see the name of the Google Billing Account that is funding this Terra Billing Project. Click on the teardrop icon next to the name of the Billing Account.
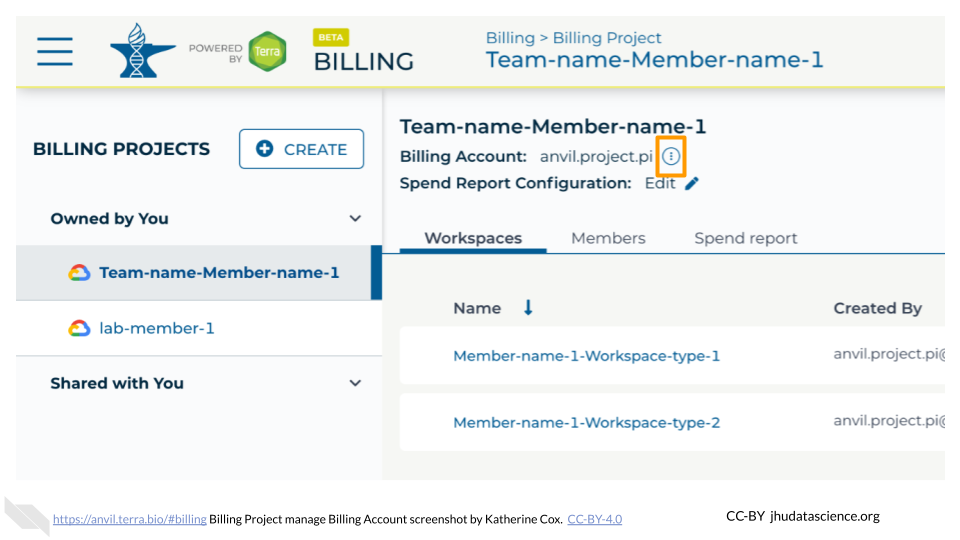
Click “Remove Billing Account”.
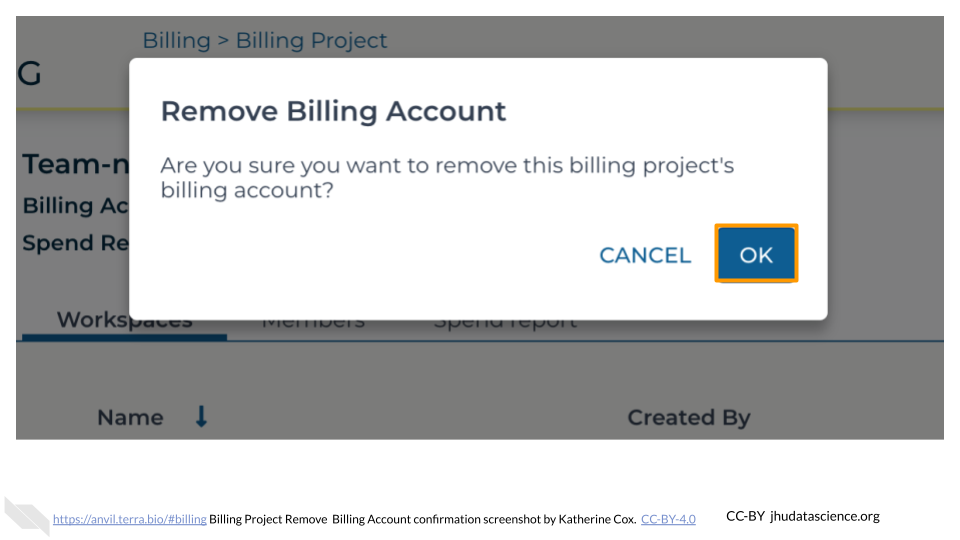
Click OK to confirm that you want to disable funding for this Billing Project.
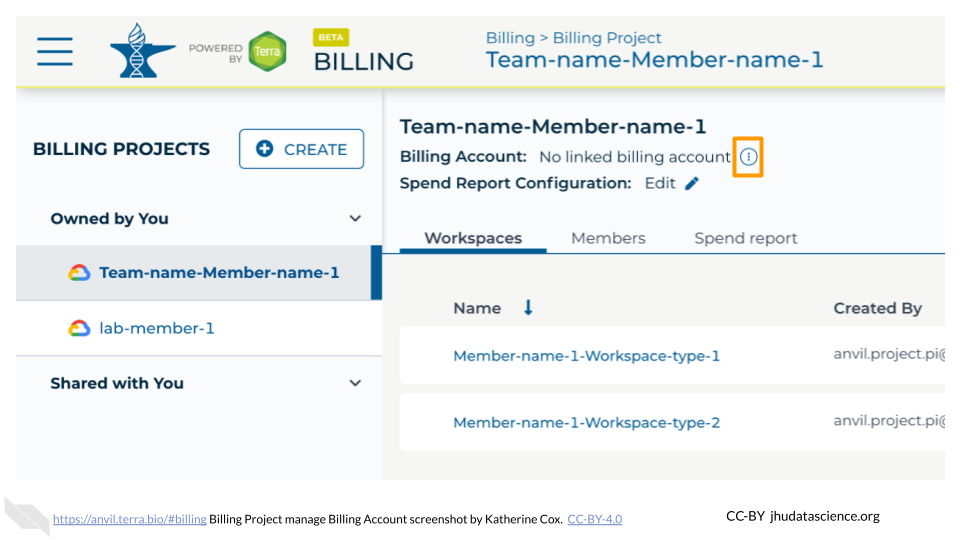
The page should now indicate that there is no linked billing account.
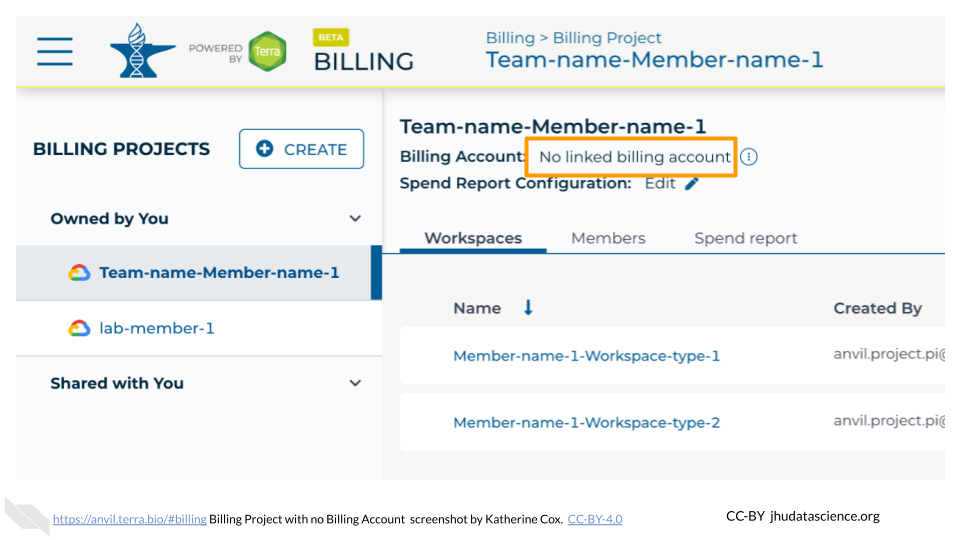
If necessary, you can restore funding to the Billing Project and associated Workspaces by clicking the teardrop icon and selecting “Change Billing Account”. However, Google makes no promises about how long the Workspace contents will remain available after you disable funding, so it is best not to rely on them.
