
Chapter 4 What does good documentation look like?
4.1 Major components of good documentation
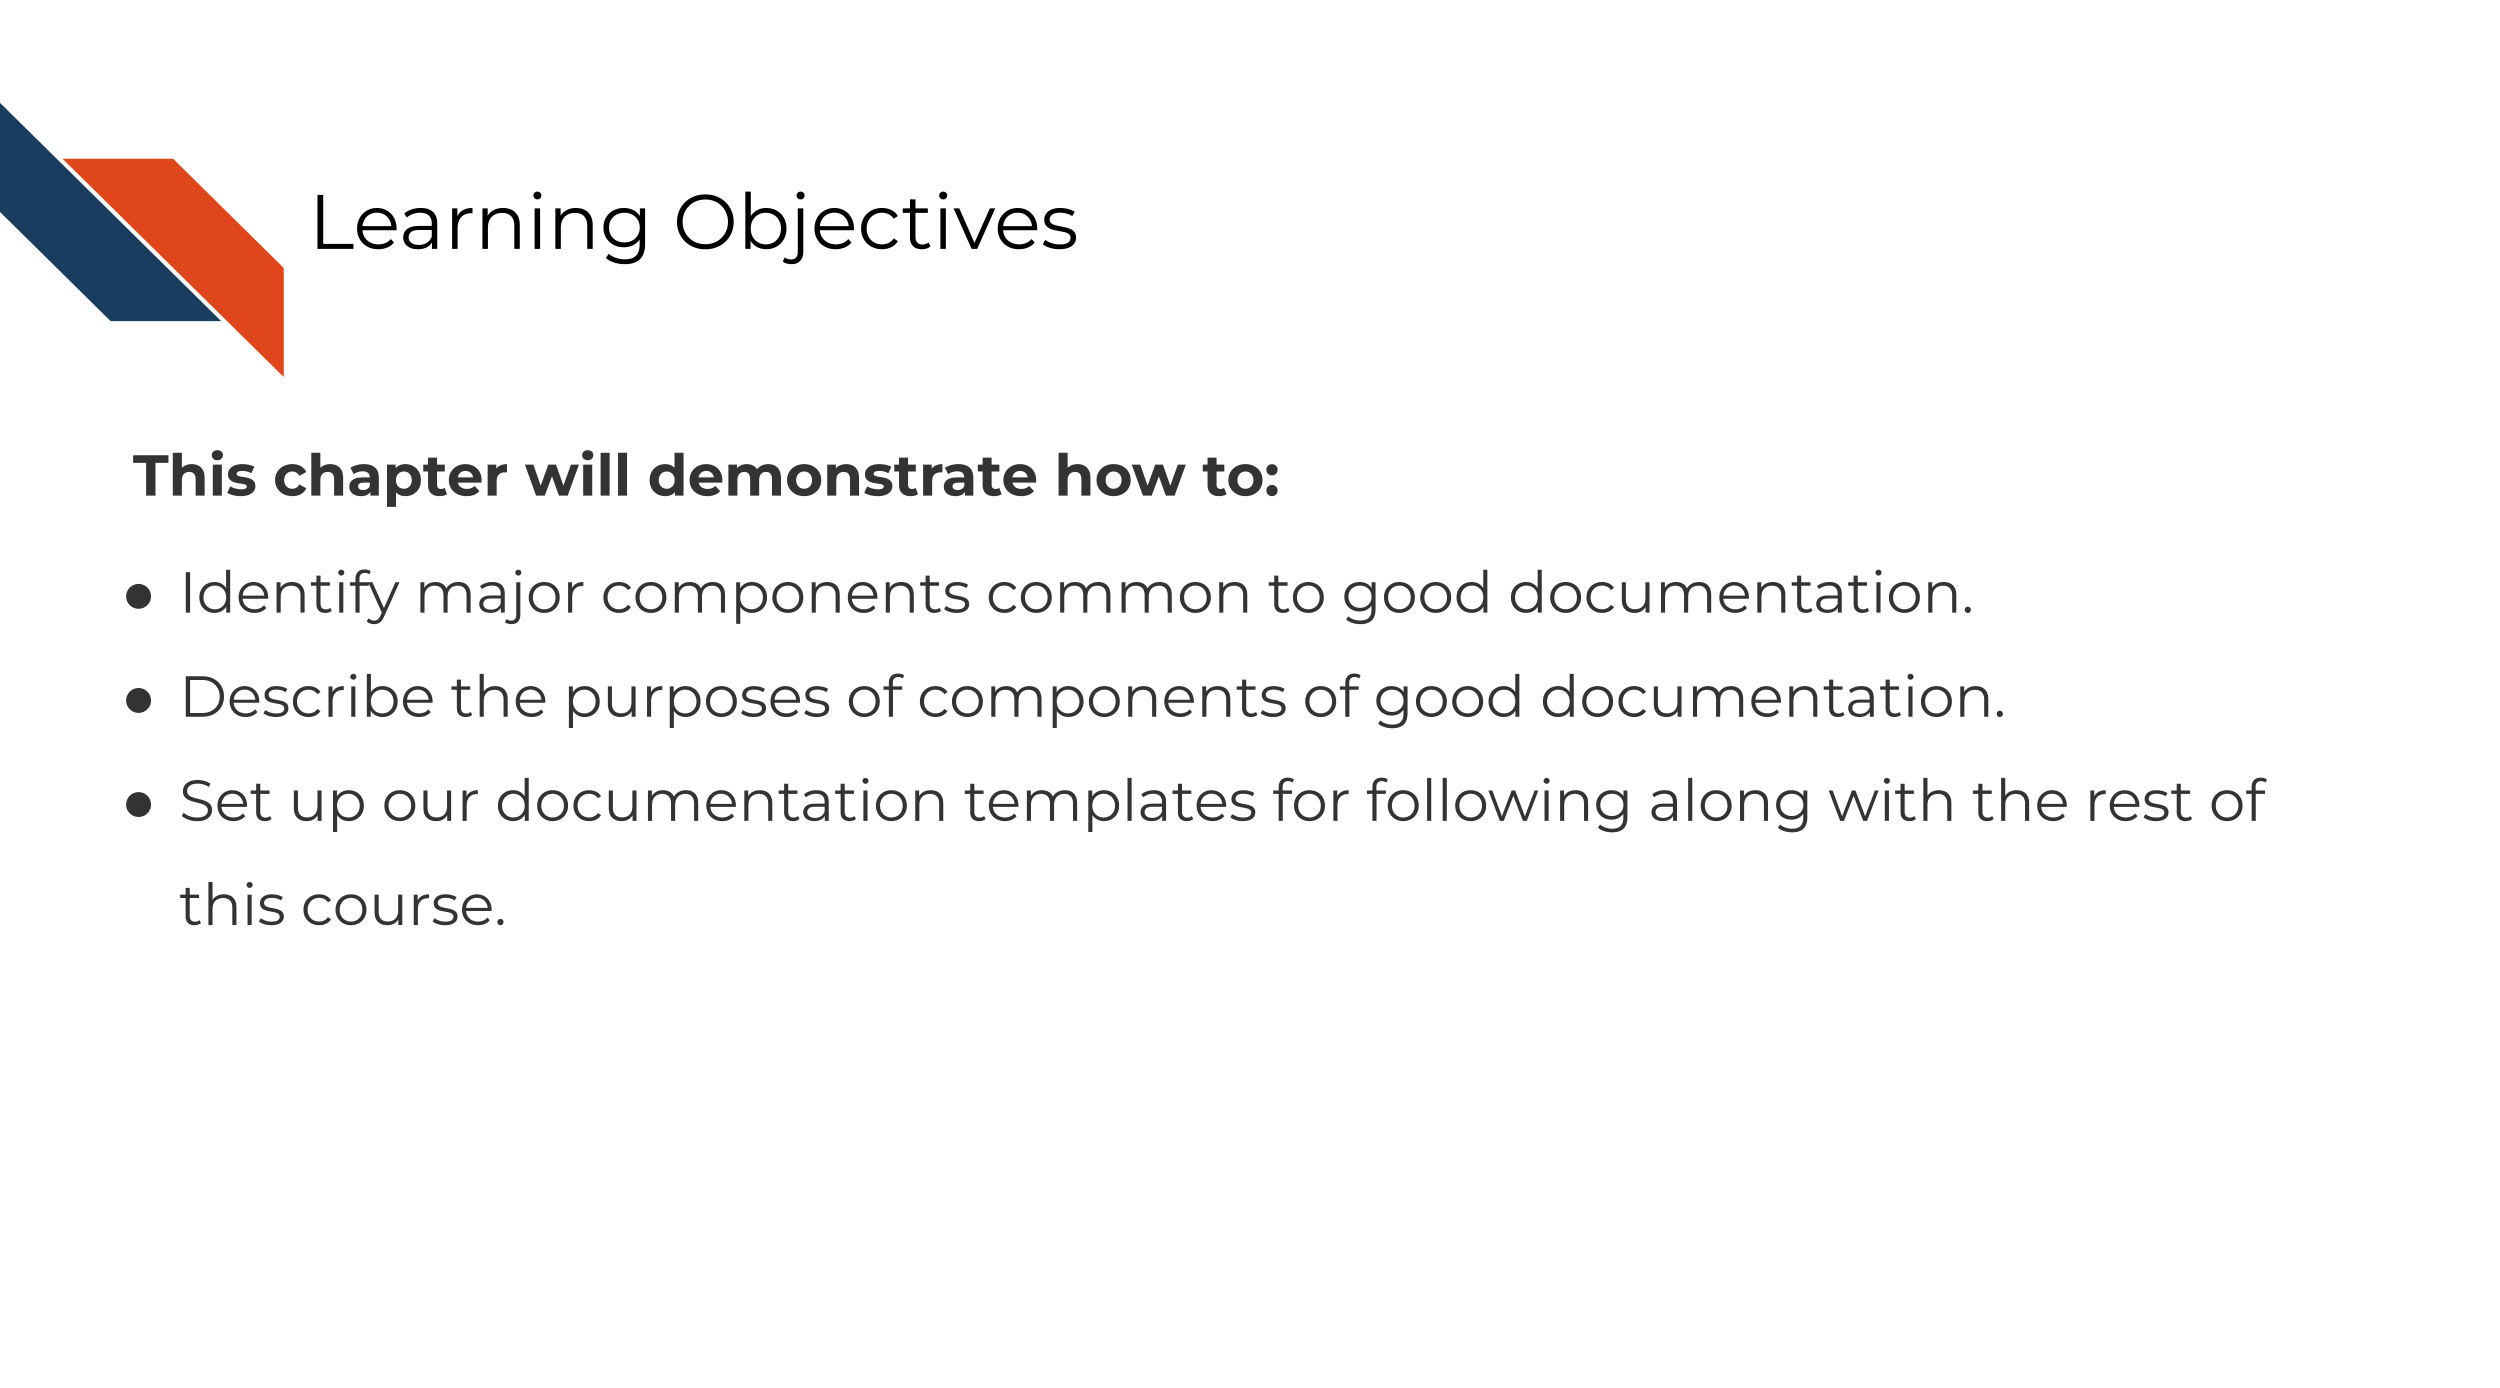
In this chapter we are going to cover the major aspects of a well-documented tool. In the subsequent chapters, we will talk about each of these components in more detail, providing relevant examples and tools. Others have divided this system into different categories which we have taken inspiration from for what we describe here (team 2024).
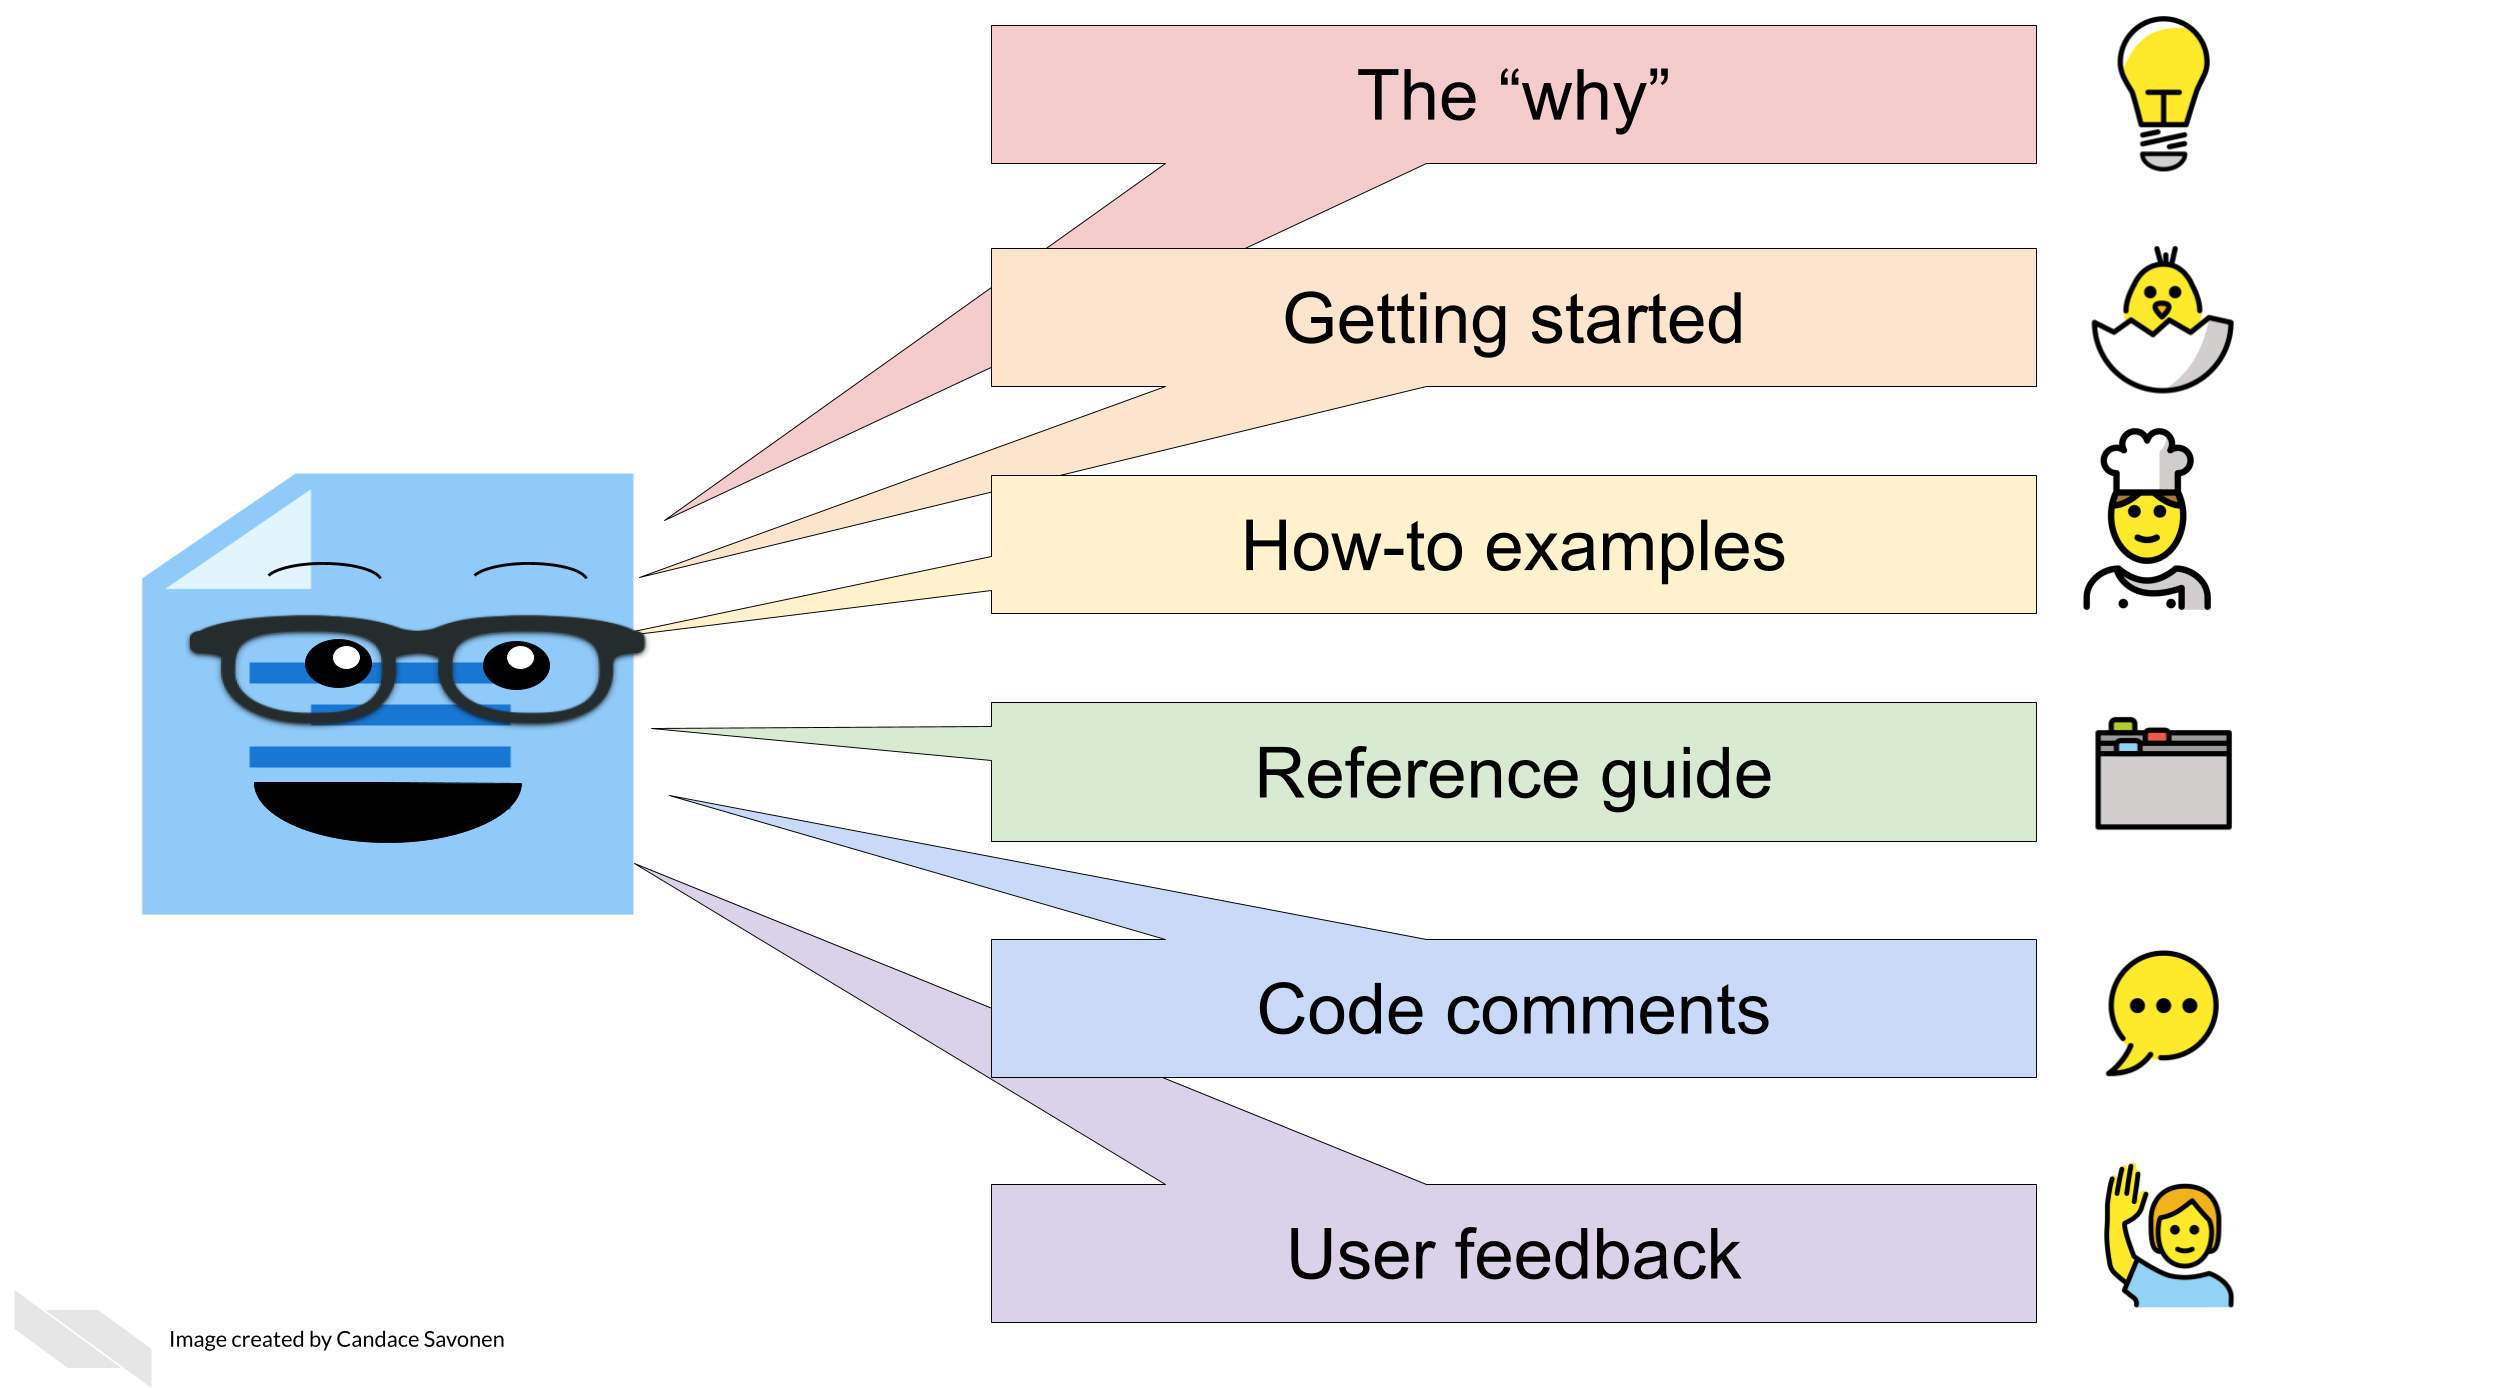
We can think of these components of documentation in terms of how much time a user has invested in learning the tool:
This isn’t always a perfect linear timeline like this, users may use these items in a different order than we expect, but this demonstrates the intent of how users would progress through the documentation.
4.1.1 The ‘Why’

Before we get into the technical information in your documentation, the first thing that should be obvious to your user is why they should want to use your tool! What need of your users does your tool fulfill? If this is not glaringly obvious, users will move on without realizing how valuable your tool could be for their research!
4.1.1.1 Exercise: Write the why of your tool!
This should be the first thing your user sees on the main page of your tool. If it currently is not clear, take this time to workshop one or two sentences that explain the ‘why’ of your tool. As you craft this sentence, think about the needs of your user and how to summarize your tool’s purpose in a brief, punchy way. Stay away from jargon unless perhaps its jargon that you know your user will understand.
Examples of tools with their why’s well-stated prominently on their web page:
Gene Set Enrichment Analysis (GSEA) is a computational method that determines whether an a priori defined set of genes shows statistically significant, concordant differences between two biological states (e.g. phenotypes).
Here, GSEA tells us the exact kind of question we can ask and what input is needed.
Salmon is a tool for wicked-fast transcript quantification from RNA-seq data. It requires a set of target transcripts (either from a reference or de-novo assembly) to quantify.
Salmon tells us its for transcript quantification but that its particular strength is it’s “wicked-fast.”
4.1.2 Getting started

A getting started section will be a new user’s first introduction to your tool. It will tell them specific steps they need to “get started” (hence why we call it this) – no long-winded explanations, just the quickest way to reach some sort of output.
In the most clear steps as possible, a getting started section will tell the user how to:
- Install the tool and any of its dependencies.
- Run the most basic analysis with the tool.
- Obtain some quick result.
It’s crucial that the steps here are simple and easy to follow or you risk losing new users before they even get going.
4.1.3 How-to examples

A set of how-to examples are like a cookbook of recipes that will demonstrate step-by-step the most common uses for your tool after they have completed the getting started steps.
- The most common use cases of your tool are shown step-by-step
- Each step is clearly provided and explained.
- Any data needed to run the example is provided.
- Example code is written with teaching in mind.
How-to examples give users next steps to get further comfortable with your tool and shows them what an analysis might look like.
4.1.4 Reference guides

A reference guide is like a dictionary that a user can look up items as questions arise. A user will likely have a specific question about a function, parameter, data type, or option and will want to be able to navigate to information about that item. Users who end up looking through your reference guide are likely a bit invested and may have already gone through the getting started section and/or how-to examples.
- All items are described in clear, non-jargon language.
- The items are searchable or at least can be easily visually scanned.
- All options and defaults are explained and linked to more information where appropriate.
4.1.5 Code comments

Comments in your source code are also a part of documentation – and likely the first part of the documentation you worked on! In most instances, if your tool is functioning fine, code will probably only be looked at by advanced and/or the most invested users. But also recall that documentation is not only for your user but for future you and existing or potential collaborators.
4.1.6 User feedback mechanism

Try as you might, you will not be able to predict every scenario that a user may engage with your tool. Your user may encounter errors or quirks that you did not foresee but that would be helpful for you to know about. Your documentation should direct your users where they should send any comments or concerns. You should also make sure that this feedback method is something you can check up on and respond to regularly. We’ll also discuss how to conduct usability research to get the most informative feedback on your tool.
4.2 The documentation templates for this course
We encourage you to create these pieces of documentation we will further discuss in the rest of this course! We have template documentation you can use to use as a starting point.
Still in progress: If you are creating documentation to accompany a package you are submitting to Bioconductor or Galaxy we are working on constructing specific templates and recommendations for those instances.
4.2.1 Well-documented checklist
This document is a checklist that summarizes the major aspects that should be included in a tools’ documentation. We recommend using it to evaluate the documentation for an existing tool and identify any gaps you may need to address, or as a to-do list for creating new documentation that you can check off as you follow along with this course.
For more inspiration, here are more articles about good documentation:
4.3 Exercise: setting up our templates for your own use
There are two options we suggest for creating documentation as you follow along with this course.
Option 1) Use these template markdowns essentially as they are (after you fill them in) and add them to an existing repository.
Pros: Is easier and quicker.
Cons: Is not as user-friendly as option 2.
Option 2) Clone a repository with these templates and set up a MkDocs github pages site. Slightly more work, but a very nice end result; see demo here.
Pros: This format of documentation sites are easy to navigate and likely familiar to your user.
Cons: Will require you to use mkdocs package to get this set up.
4.3.1 Steps for Option 1) Adding completed template markdowns to an existing GitHub repository
- Download the folder of templates using this link.
- Complete each markdown template, filling in the blanks as you go along with the course.
- File a pull request to your repository to add these files.
- (Optional but encouraged) Publish your repository to Github Pages.
Here’s what’s in that folder:
templates/
├── well_documented_checklist.md
├── getting_started_template.md
├── how_to_examples.md
├── reference_guide_template.md
├── bioconductor-guides/
│   ├── bioconductor_example_script.R
│   ├── bioconductor_vignette_template.Rmd
│   └── README.md
└── galaxy-guides/
4.3.2 Steps for Option 2) Creating a MkDocs site with Github pages
- Go to our template documentation repository.
- Click
Use this Templateto get started. - Name your repository something that relates to your tool.
On your computer’s command line:
git cloneyour new repository you made from our template.
- Navigate to your the root of your local version of this repository.
- Install mkdocs following their instructions.
- Run
mkdocs serveto see a preview of your docs.
- Edit the template pages we’ve provided in the
docs/folder.
- As you make changes you can run
mkdocs buildand thenmkdocs serveto see a preview.
- When you are ready to publish your documentation to its own website, run
mkdocs gh-deploy, it will return the web address of your new site - Go to that address and bask in the success of your newly made documentation!
Now that we have a basic structure and plan for our documentation, let’s discuss each each section of this documentation in more detail!
References
For all cartoons:
Avataars by https://getavataaars.com/.
Icons by https://thenounproject.com/ License CC BY-NC-ND 2.0.
Emojis by OpenMoji License: CC BY-SA 4.0.↩︎